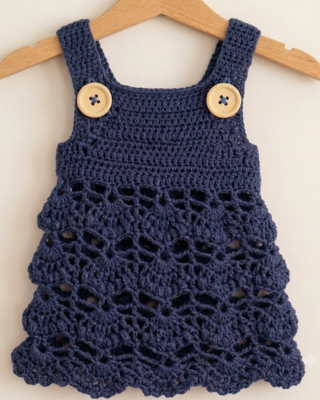

There is something incredibly special about crocheting a baby dress. Maybe it’s the tiny stitches, maybe it’s imagining a little one twirling in it, or maybe it’s just the joy of watching a beautiful design grow row by row in your hands. Whatever the reason, this Crochet Baby Dress with Puff Stitch Skirt is one of those projects that feels magical from start to finish.
This dress begins with a classic square yoke worked in rows, which makes it easy to size and adjust. The shaping is simple and clever, using double crochet stitches and dc3tog clusters to form clean corners and structure. Once the yoke is complete, the piece is joined and worked in the round, transforming into a soft, airy skirt filled with delicate texture.
Stitches Used
- Chain stitch: ch
- Double crochet: dc
- Double crochet three stitches together: dc3tog
- Puff stitch: ps
- Space: sp
- Skip stitch: sk
- Slip stitch: ss
- Single crochet: sc
- Yarn over: yo
ooking for your next crochet project? Whether you love making adorable baby outfits or cozy handmade clothes for yourself, these 3 beautiful crochet patterns are full of inspiration! !
- 1. Crochet Baby Romper Pattern
- 2. Crochet Newborn Baby Dress (0–6 Months)
- 3. Beige Patchwork Cardiga
The finished dress measures approximately 10 inches across (under the arms) and about 15 inches from shoulder to hem. The back opening allows for easy dressing, and a small 1 cm button adds a sweet finishing touch. You can easily adjust the length by repeating additional skirt rounds if you’d like it longer.
Whether you’re making this for your own child, as a heartfelt baby shower gift, or to sell in your handmade shop, this crochet baby dress is a beautiful and timeless design. Choose soft pastels for a delicate look, bright tones for a playful style, or even a classic white for a traditional touch.
Notes
Puff stitch: Yo, insert hook into sp, yo, pull up a loop, yo, insert hook into same sp, yo, pull up a loop, yo, insert hook into same sp, yo, pull up a loop, yo and pull through all loops on hook, and close with ch 1.
- Whenever you see the word turn, it means to turn your work clockwise so you can work back down the row.
- When you are finished working the neck and arms, you will join and work in the round. At that point, you may turn your piece right side out if desired.
- Before starting the sc edging, you may close the back opening a little if you want. The finished dress should measure 10 inches across, just under the arms, and 15 inches from shoulder to bottom of dress.
Square Yoke
You will start by making a square yoke.
Row 1: Ch 65, 1 sc in second ch from hook and in every ch across.
Row 2: Ch 2 and turn, 1 dc in next 7 sc, ch 1, do dc3tog in next st, ch 1 to close, ch 2, in next st do dc3tog, ch 1 to close, ch 1, (1 dc in next 14 sc, ch 1, do dc3tog in next st, ch 1 to close, ch 2, in next st do dc3tog, ch 1 to close, ch 1)* repeat from * to ** 2 more times. 1 dc in the next 7 sc.
Row 3: Ch 2 and turn, 1 dc in next 7 dc, 1 dc in ch 1 sp, ch 1, into ch 2 sp do dc3tog, ch 1 to close, ch 2, dc3tog ch 1 to close, in same sp, ch 1, 1 dc in ch 1 sp, (1 dc in next 14 sts, 1 dc in ch 1 sp, ch 1, in next ch 2 sp do dc3tog, ch 1 to close, ch 2, dc3tog, ch 1 to close, ch 1, 1 dc in ch 1 sp)* repeat from * to ** 2 more times, 1 dc in next 7 dc.
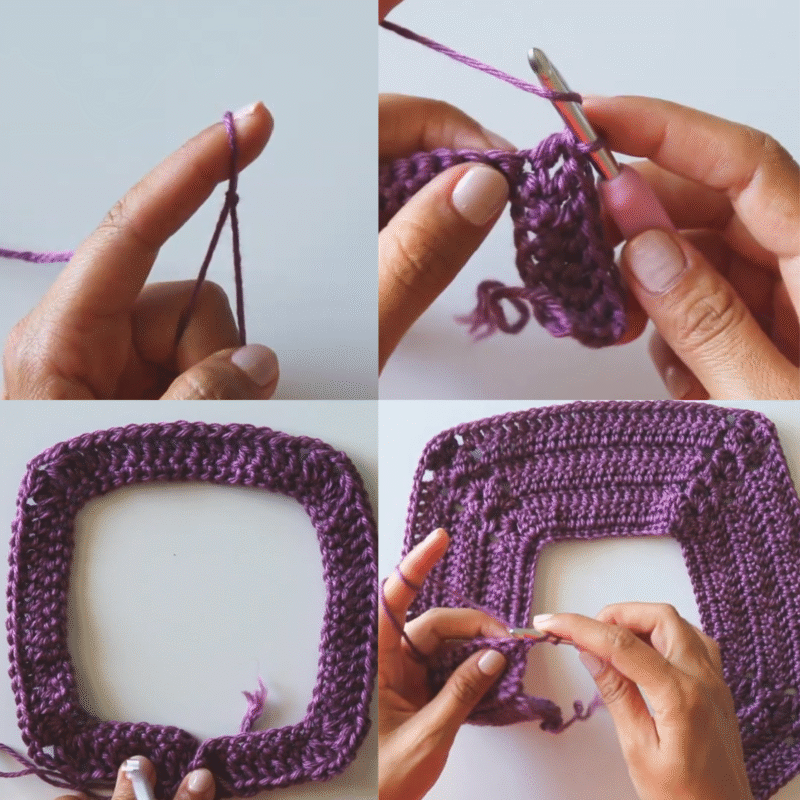
Rows 4–8: Repeat Row 3. Each row will add 2 more sts to the 2 sides and front, and 1 more st for each of the back pieces.
Joining for the Body
Row 9: Ch 2 and turn, 1 dc in next 12 dc, 1 dc in ch 1 sp, 2 dc in ch 2 sp, ch 6, sk the next 24 dc and do 2 dc in next ch 2 sp, 1 dc in next ch 1 sp, 1 dc in next 24 dc, 1 dc in ch 1 sp, 2 dc in ch 2 sp, ch 6, sk next 24 dc, 2 dc in ch 2 sp, 1 dc in ch 1 sp, 1 dc in last 12 dc. Join two back pieces together with a ss into first dc.
Rnd 10: Ch 2, and turn, 1 dc in each dc and 1 dc in each ch of the ch 6 around, ss into first dc.
Rnd 11: Ch 2 and turn, 1 dc in each dc around, ss into first dc.
Turn your piece right side out.
Skirt
Rnd 12: Ch 7, no turning from now on. Sk 4 sts, 1 dc, ch 3, 1 dc in same st, (ch 4, sk 3, 1 dc in next st, ch 4, sk 3, 1 dc, ch 3, 1 dc, in same st)* repeat from * to ** around. You will be left with 3 sts, ch 4, and ss into 3rd ch of ch 7.
Rnd 13: Ch 5, 7 dc in ch 3 sp, ch 2, 1 dc in next dc st, (ch 2, 7 dc in ch 3 sp, ch 2, 1 dc in next dc st)* repeat from * to ** around, ch 2 and ss into 3rd ch of ch 5.
Rnd 14: Ch 4, (do 1 dc and ch 1 in each of the next 7 dc, 1 dc in next dc, ch 1)* repeat from * to ** around. After last dc and ch 1, ss into 3rd ch of ch 4.
Refer to Notes for the puff stitch.
Rnd 15: Ch 5, (do 1 ps into ch 1 sp in between each of the next 7 dc, you should have 6 ps, ch 2, 1 dc in next dc st, ch 2)* repeat from * to ** around and ss into 3rd ch of ch 5.
Rnd 16: Ch 7, (do 1 dc, ch 3, 1 dc into ch sp in between the 3rd and 4th ps, ch 4, 1 dc in next dc, ch 4)* repeat from * to ** around and ss into 3rd ch of ch 7.
Rnds 17–26: Repeat Rnds 13, 14, 15, 16 two more times, then repeat Rnds 13 and 14 one more time.
Rnd 27: Ch 1, into each of the ch 1 sps between the 7 dc, do 1 sc, 1 ps, 1 sc, you will have 6 ps sts. (Sk the next dc, and repeat the 1 sc, 1 ps, 1 sc, into the next ch 1 sps between the next 7 dc)* repeat from * to ** around. Ss into 1st sc st, ch 1 and cut yarn. Weave in tail.
Neck and Arm Edging
To finish, you will do a sc edge around the neck and arms.
Ss into 1st st of the neck and sc around top and back opening. After your last st, cut yarn and thread the tail into needle. Insert needle into first sc, then into last sc, then weave in yarn.
Repeat for arms.
Sew the button to the back opening if desired.