
There’s something incredibly special about crocheting for a baby. Every stitch is made with love, turning soft yarn into a tiny outfit that’s sure to become a cherished keepsake. This Crochet Baby Romper Pattern is designed to be both adorable and practical, giving you a timeless piece that’s comfortable for little ones and enjoyable to create.
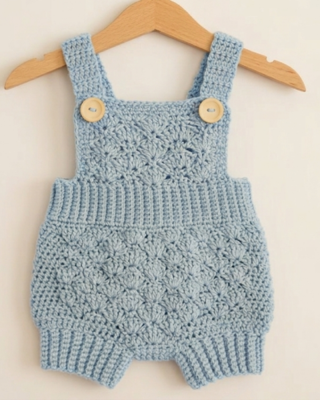
Whether you’re crocheting for your own baby, a family member, or a thoughtful handmade gift, this romper is a rewarding project from beginning to end. The pattern features simple techniques, a beautiful textured finish, and easy-to-follow steps that help you enjoy every row without feeling overwhelmed.
Create a Handmade Outfit to Treasure
By the time you weave in the last end, you’ll have a cozy baby romper that’s perfect for everyday wear, milestone photos, baby showers, or keepsake memories. Grab your favorite baby yarn, settle into your favorite chair, and enjoy creating a handmade garment that will be loved for years to come.
(Size 0–6 months, made from the waist down)
Materials
- Aran weight cotton yarn (approx. 50 g / 75 m per skein) — about 3 skeins needed for the 0–6 month size. Merino wool is a good substitute if you’d like extra softness and stretch.
- 3.5 mm crochet hook (for the ribbing sections)
- 4.5 mm crochet hook (for the main body sections)
- Stitch markers (or small pieces of contrasting yarn)
- Yarn needle
- Scissors
- 2 buttons, approx. 2.5 cm (1 in) wide
Abbreviations
- ch – chain
- sc – single crochet
- hdc – half double crochet
- dc – double crochet
- hdc2tog – half double crochet 2 stitches together (decrease)
- sl st – slip stitch
- BLO – back loop(s) only
- st(s) – stitch(es)
Part 1: Waist Ribbing
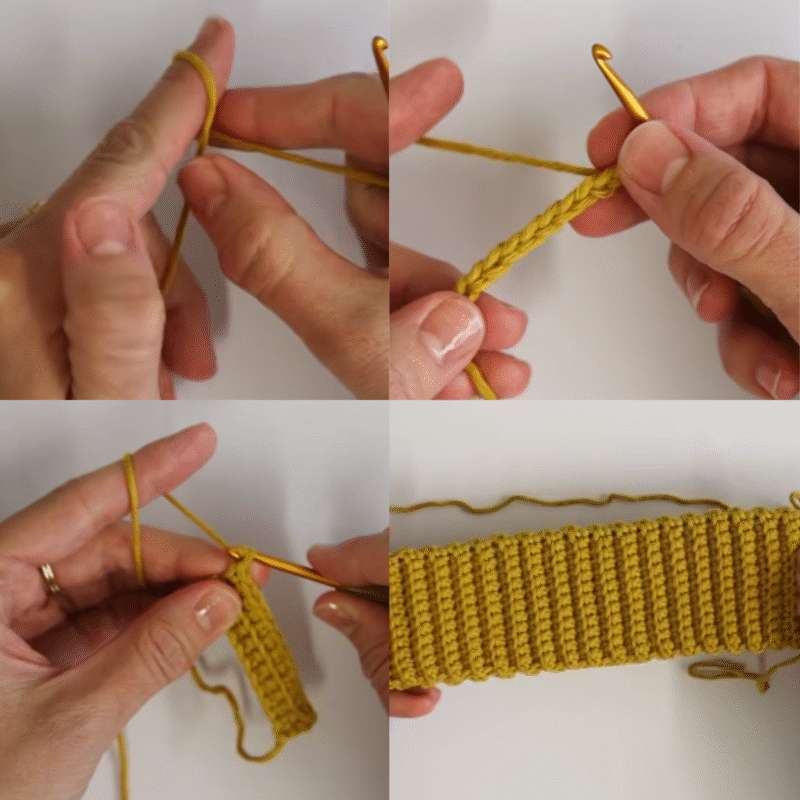
Use the 3.5 mm hook. This ribbing is worked in rows using single crochet through the back loops only, which creates a stretchy ribbed texture.
- Make a slipknot and chain 13.
- Row 1: Sc in the 2nd chain from the hook and in each chain across (12 sts total).
- Ch 1, turn.
- Row 2 onward: Sc in the BLO of each stitch across (12 sts). Ch 1, turn after each row.
- Repeat this BLO single crochet row until you have 78 rows total.
- Lay the ribbing flat and check that its length matches the waist circumference of the romper. Add or remove rows as needed — keep in mind each row will later become one stitch around the main body, so adjusting the row count changes the main-body stitch count too.
- Fold the ribbing in half so the two short ends meet, with rows lined up evenly.
- Join the short ends with slip stitches: insert the hook through the front loop of the foundation chain on one side and the front loop of the last row on the other side, yarn over, and pull through. Repeat across the edge for a total of 12 slip stitches.
- Do not cut the yarn — you’ll continue directly into the main body.
Part 2: Main Body
Switch to the 4.5 mm hook. This section is worked in joined rounds (chain 1, do not turn, join each round with a slip stitch).
Keeping the seam straight: Alternate which stitch you start each round in — one round start in the first stitch of the round below and end in the last stitch (skipping the slip stitch); the next round start in the second stitch and end in the slip stitch. Continue alternating this way throughout, being careful not to accidentally add stitches.
- Round 1: Work 1 sc into each row along the long edge of the ribbing (78 sc total, one per ribbing row). Join with a sl st into the first sc.
- Ch 1, do not turn.
- Rounds 2–8: Work 1 hdc into each stitch around (78 sts). Join each round with a sl st, ch 1, and begin the next round — alternating your starting stitch as described above.
- Round 9 (increase round): Hdc into first 19 sts, then work 2 dc into the same next stitch (increase). Hdc into next 38 sts, then work 2 dc into the same next stitch again (increase). Finish the round with hdc into each remaining stitch. Join with sl st.
- Rounds 10–11: Hdc into each stitch around (80 sts total). Join each round with sl st.
- Round 12 (increase round): Hdc into first 20 sts, increase with 2 hdc into the next stitch, hdc into next 38 sts, increase again with 2 hdc into the next stitch, then hdc into the remaining 20 sts (82 sts total). Join with sl st into the first hdc of the round.
- Rounds 13–14: Hdc into each of the 82 sts around, with no increases. Join each round with sl st.
Your main body piece is now complete — the ribbing forms the waistband, and the crocheted fabric will become the front and back of the romper. If you’d like a longer romper, add extra plain rounds here (this won’t affect the leg ribbing stitch counts). When you’re happy with the length, fasten off.
Part 3: Leg Opening Shaping
This section creates the two small shaping panels — one on the front, one on the back — that give the romper its pants-like shape between the legs. Both panels are made identically.
- Lay the romper flat, folded in half lengthwise with the seam at the back, to find the center front and center back.
- Mark 11 stitches centered on the front, and 11 stitches centered on the back (marker at the start and end of each group of 11).
- Using the 4.5 mm hook, join yarn in the first marked stitch and work toward the second marker, turning after each row.
- Row 1: Ch 1. Hdc2tog over the first 2 sts, hdc into each of the next 7 sts, then hdc2tog over the last 2 sts.
- Row 2: Ch 1. Hdc2tog over first 2 sts, hdc into next 5 sts, hdc2tog over last 2 sts (7 sts total at the end of this row).
- Row 3: Ch 1. Hdc into each of the 7 sts across.
- Fasten off, leaving a long tail from either the front or back panel for sewing later.
- Repeat all of the above steps on the opposite (back) marked section to create the matching panel.
- With right sides facing the way you want the seams hidden, sew the front and back panels together using the long tail, joining them at the leg opening area so the romper takes on its pants shape.
Part 4: Leg Ribbing (make 2)
Switch back to the 3.5 mm hook. Make two identical ribbing pieces, one for each leg opening — worked the same way as the waist ribbing, just smaller.
- Make a slipknot and chain 9.
- Row 1: Sc in the 2nd chain from hook and in each chain across (8 sts).
- Ch 1, turn.
- Row 2 onward: Sc in BLO of each stitch across (8 sts). Ch 1, turn.
- Repeat this BLO row until you have 36 rows total.
- Before joining, wrap the ribbing around the leg opening to check the fit — add or remove rows as needed until it matches (here you’re adjusting the ribbing to fit the finished leg opening, not the other way around).
- Fold the ribbing in half so the short ends meet and join with slip stitches (through the front loops of the foundation chain and last row) for a total of 8 slip stitches. Try not to make this seam too tight.
- Fasten off, leaving a long tail for sewing.
- Repeat steps 1–8 to make the second leg ribbing.
Attaching the leg ribbing:
- Turn the romper wrong side out.
- Turn one ribbing piece right side out and insert it into a leg opening so the right sides of the ribbing and romper are touching, with the ribbing’s seam lined up with the inside of the leg opening.
- Thread the long tail and sew the ribbing to the leg opening, gently stretching the ribbing as you go so it distributes evenly around the opening.
- Secure the yarn and weave in ends.
- Repeat for the second leg opening.
- Turn the romper right side out and check that both leg openings sit neatly.
Part 5: Straps
Lay the romper flat, back side up, right side out.
- On the back side of the waist ribbing, mark two groups of 5 stitches for the straps, leaving 11 unmarked stitches between them (remember each ribbing row counts as one stitch here).
- Using the 3.5 mm hook, join yarn in the first marked stitch of one strap group.
- Row 1: Ch 1, hdc into each of the next 5 sts (5 sts total).
- Turn. Row 2 onward: Ch 1, hdc into each stitch across (5 sts). Turn after each row.
- Repeat this hdc row until you have 33 rows total, or until the strap reaches your desired length (you can add extra rows if needed — try laying the strap over the front of the romper to check the fit before making the buttonhole).
- Row 34 (buttonhole row): Hdc into each of the next 5 sts. Chain 7, then skip 4 stitches and attach the chain with a slip stitch into the 5th stitch to form the buttonhole loop.
- Turn and work 10 sc around the chain-7 space. Join with a sl st into the side of the last strap row. Fasten off.
- Repeat steps 2–7 to make the second strap, making sure it has the same number of rows as the first so both straps match in length.
- Lay both straps over the front of the romper to check where the buttons should sit.
Part 6: Attaching the Buttons
- Lay the romper flat, front side up, and bring both straps from the back over the shoulders to the front, making sure they’re straight and not twisted.
- Double-check both straps are the same length and their buttonholes sit at the same height.
- Thread a yarn needle and sew the first button securely to the front of the romper, stitching through the button holes several times. Keep the tension gentle enough that the button holes can still slide over the button easily.
- Secure the yarn on the wrong side and weave in the ends.
- Repeat for the second button.
- Close both straps over the buttons and check that everything sits and opens/closes properly.

One Comment
Comments are closed.