Materials
- Barroco #4 yarn, natural color (677 m / 590 tex per unit) — or, as an alternative, 2 strands of Anne yarn held together (gives the same thickness and effect)
- 3.5 mm crochet hook (or thicker, if you prefer)
- Scissors
- Measuring tape
Abbreviations
- ch – chain
- sc – single crochet
- sl st – slip stitch
- dc – double crochet
You may also like these projects:
- 10 Summer Crochet Projects
- 15 Easy Crochet Pouch Patterns
- 10 Easy Crochet Summer Hat Tutorial Ideas
- 10 Crochet Keychain Ideas
Part 1: Foundation Chain
- Chain approximately 82 cm worth of chain stitches (bust measurement, size S). Reduce by 5–10 cm for smaller sizes.
- Join the chain into a circle with a sl st in the first chain.
Part 2: “Little Square” Rounds (9 rounds)
This section forms the open, lacy base of the top. It’s important that the total number of squares at the end of round 1 be an even number — count in twos to make sure of this.
Round 1:
- Chain 3 (counts as 1 dc).
- Chain 1, skip 1 foundation chain, and work 1 dc in the next chain.
- Repeat this pattern (ch 1, skip 1, 1 dc) all the way around.
- Join with a sl st into the 3rd chain of the starting ch-3.
Rounds 2–9:
- Chain 3 (1 dc), chain 1, then work 1 dc into the top of the next dc from the round below.
- Repeat (ch 1, 1 dc into next dc) all the way around.
- Join with a sl st into the 3rd chain of the starting ch-3.
- Repeat this round until you have 9 rounds total of squares.
Reference measurement: 9 rounds of squares = approximately 12 cm in height.
Part 3: “Block” Rounds (6 rounds)
- Check that your square count is still an even number.
- Work into a chain space: chain 3 (1 dc) plus 2 more dc into the same space, forming a group of 3 dc.
- Chain 1 to separate, skip the next foundation space, and work another group of 3 dc into the following space.
- Repeat (3-dc group, ch 1, skipping a space each time) all the way around.
- Join with a sl st into the 3rd chain of the starting ch-3.
- For the following rounds, slip stitch across to the next chain space and repeat the same block pattern (groups of 3 dc separated by 1 chain) until you have 6 rounds total.
Reference measurement: 6 rounds of blocks = approximately 8.5 cm; combined with the squares section, the total height is about 20 cm.
Part 4: Dividing for the Neckline
- Count your total number of “blocks” and divide that number in half: one half for the front, one half for the back. (Example from the video: 28 blocks total → 14 for the front and 14 for the back. If your number is odd, give the extra block to the back.)
- Mark this division with stitch markers.
- Divide the front section in half again (e.g., 14 blocks → 7 on each side) to shape the V-neck.
First side of the neckline
- Start exactly where you closed off the last round with a sl st.
- Chain 3 and work 3 dc into the next space.
- Continue the block pattern (3 dc, ch 1 to separate) as before, but now working in back-and-forth rows instead of in the round.
- Decrease one block each row: when you reach the last marked block, skip the separating chain — go straight into the space and work the dc, creating the decrease on that side.
- Turn your work, chain 3, work 3 dc into the space, and keep decreasing one block per row until only 1 block remains.
- Fasten off.
Second side of the neckline
- Join the yarn into the first stitch of the block on the other side of the neckline division.
- Repeat the exact same decrease process from the first side, working back-and-forth rows until only 1 block remains.
- Don’t fasten off yet — the back section (which stays straight, with no neckline shaping) is left open so you can continue directly into the border.
Part 5: Border Around the Neckline and Armholes
Working all the way around the piece (neckline plus the straight back section):
- At each dc from the base, work 2 sc (one on each side of the dc).
- Along the back section (where there’s no neckline shaping), work 1 sc for each base dc and 1 sc into each chain space.
- Repeat this pattern all the way around.
- Join with a sl st at the starting point.
Part 6: Bottom Border
Start preferably at the top of a dc, at a side seam (so the join is hidden along the side).
Round 1:
- Join the yarn, chain 1, and work 1 sc into it.
- Continue: 1 sc into the next chain, 1 sc into the top of the next dc — alternating one sc per chain and one sc per dc, all the way around.
- Join with a sl st into the first sc.
Rounds 2–3 (3-dc blocks):
- Chain 3 (1 dc), work 2 more dc into the next sc, forming a group of 3 dc.
- Chain 1 to separate, skip 1 base stitch, and work another 3-dc group into the next stitch.
- Repeat (3-dc group, ch 1, skipping 1 stitch) all the way around.
- Join with a sl st into the 3rd chain of the starting ch-3.
- Repeat this round until you have 3 rounds total.
Part 7: Final Picot/Shell Edging
- Slip stitch across to the next chain space.
- In that space, chain 2 and work 3 dc into the same space.
- Work 1 sc into the next chain space.
- Repeat (ch 2 + 3 dc in space, 1 sc in the following space) all the way around.
- Join with a sl st and fasten off.
Part 8: Straps
- Make 2 crochet chain cords, each approximately 1.30 to 1.50 m long.
- Thread each cord through the blocks at the top of the top, one on each side.
- Cross the straps in front (or leave them straight, if you prefer) and tie a knot at the center front to adjust the fit at the bust.
- Bring the ends to the back, thread them between the blocks, and tie a knot at the center back to adjust.
- Adjust the fit as needed — since crochet stretches with wear, it’s better to leave the straps adjustable rather than fixed in place.
Finishing and Final Measurements
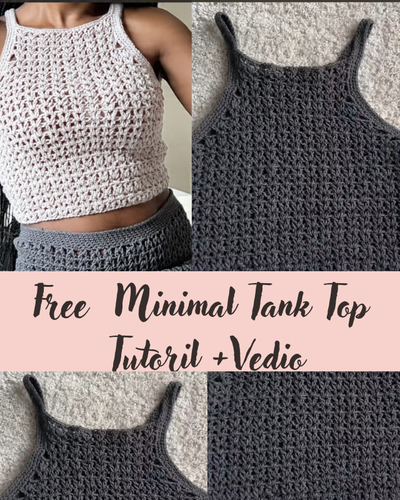
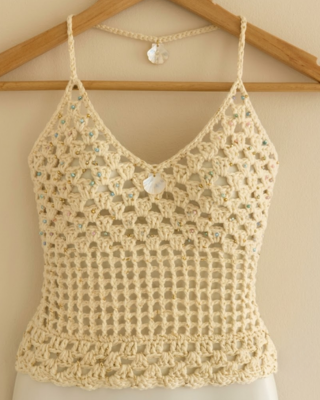
- Total length of the piece (from the tip of the neckline to the bottom edge): approximately 37 cm.
- To make the top larger, add extra rounds to any of the three main sections: squares, blocks, or the bottom border.
- Approximate weight of the finished piece: 157 g — very economical in terms of yarn used.