Bear Hat Crochet Pattern
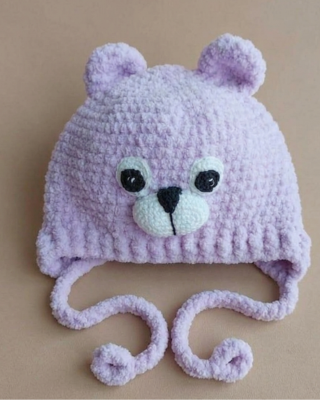
Looking for a cute and cozy crochet project? Want to make an adorable bear hat that’s perfect for babies, kids, or even adults? Or maybe you’re searching for a beginner-friendly pattern that’s both fun and practical?
You’re in the right place.
In this step-by-step tutorial, you’ll learn how to crochet a soft and stylish bear hat using simple stitches and easy techniques. This pattern is perfect for creating warm winter accessories or unique handmade gifts.
Materials Needed:
- Alize Softy Baby yarn (work with 2 strands) in any color you like
(1.5–2 skeins depending on hat size) - YarnArt Jeans yarn in white and black (¼ skein each)
- Fiberfill (a small amount)
- Needle with a large eye
- Crochet hooks 2.5 mm and 5 mm
Abbreviations:
- ch – chain
- sc – single crochet
- dc – double crochet
- hdc – half double crochet
- inc – increase
- dec – decrease
- sl st – slip stitch
- MR – magic ring
Notes
(The number in brackets indicates the total stitches in the round.)
Hat
- 6 sc in MR (6)
- 6 inc (12)
- (1 sc, inc) ×6 (18)
- (2 sc, inc) ×6 (24)
- (3 sc, inc) ×6 (30)
- 2 sc, inc, (4 sc, inc) ×5, 2 sc (36)
- (5 sc, inc) ×6 (42)
- (6 sc, inc) ×6 (48)
- 4 sc, inc, (7 sc, inc) ×5, 3 sc (54)
- (8 sc, inc) ×6 (60)
11–22. 60 sc (12 rounds)
Now begin the ears section.
From round 24 work in turning rows. At the end of each row, make 1 ch for turning.
- 16 sc, turn work from this row
- 8 sc
- dec, 4 sc, dec (6)
- dec, 2 sc, dec (4)
- dec, 2 sc (3)
Work sc down to the base of the hat (5 sc).
Now the row will begin here:
- 36 sc
Continue working in turning rows. At the end of each row make 1 ch.
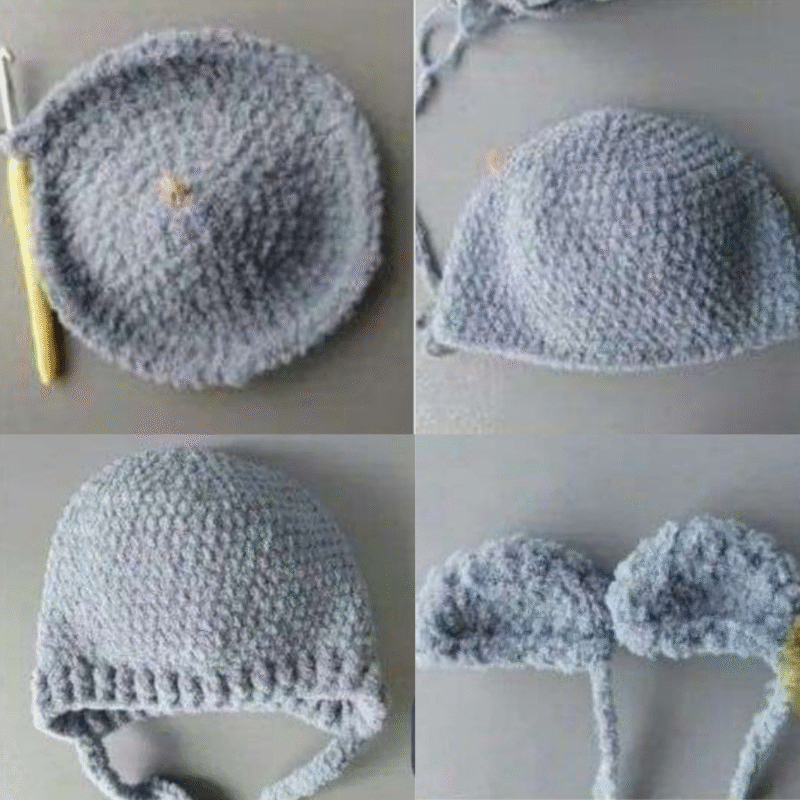
- 8 sc
- dec, 4 sc, dec (6)
- dec, 2 sc, dec (4)
- dec, 2 sc (3)
Ribbing and Ties
- (1 front post stitch, 1 back post stitch) ×35 (70)
- 27 post stitches (alternating front/back),
25 ch, turn, 25 sl st (last stitch worked into base of tie),
42 post stitches (alternating front/back),
25 ch, turn tie, 25 sl st, 1 post stitch.
Make sure the ties are centered under the ears.
Cut yarn and fasten off.
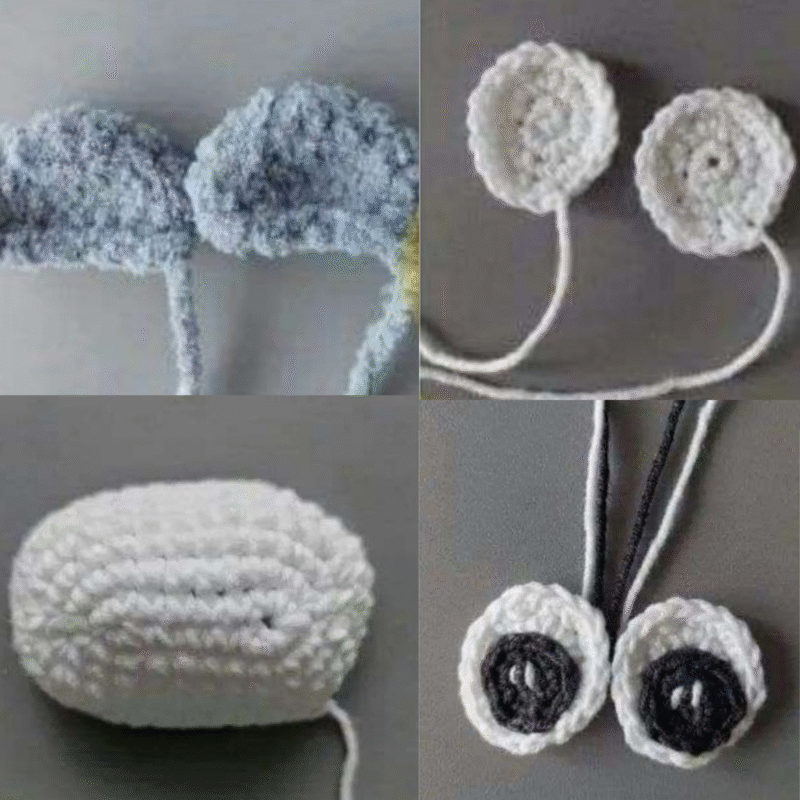
Ears (Make 2)
Using main yarn and 5 mm hook:
- 6 sc in MR
- 6 inc (12)
- (1 sc, inc) ×6 (18)
4–5. 18 sc (2 rounds)
Fold in half and crochet through both sides: 4 dec, 1 sc.
Cut yarn leaving a long tail for sewing.
Muzzle
Using white YarnArt Jeans and 2.5 mm hook.
Chain 8.
- inc, 5 sc, 4 sc in last stitch, 5 sc, inc (18)
- 2 inc, 6 sc, 2 inc, 8 sc (22)
- 2 inc, 9 sc, 2 inc, 9 sc (26)
- 4 inc, 9 sc, 4 inc, 9 sc (34)
5–7. 34 sc (3 rounds)
Cut yarn leaving long tail for sewing.
Nose
Using black YarnArt Jeans and 2.5 mm hook.
Chain 5.
Work in turning rows, 1 ch at end of each row:
- 4 sc
- dec, 2 sc (3)
- dec, 1 sc (2)
- dec (1)
Work sc evenly around the nose.
Cut yarn leaving long tail for sewing.
Eyes
White Part (Make 2)
Using white YarnArt Jeans and 2.5 mm hook:
- 6 sc in MR
- 6 inc (12)
- (1 sc, inc) ×6 (18)
- 2 sc, inc, 1 sc, sl st
Cut yarn leaving long tail for sewing and highlights.
Black Part (Make 2)
Using black YarnArt Jeans and 2.5 mm hook:
- 5 sc in MR
- 5 inc (10)
- sl st
Cut yarn leaving long tail for sewing and for eyebrows/face shaping.
Sew black part onto white part.
Embroider highlights.
Assembly
Sew all parts onto the hat.
Sew the muzzle 1 row above the ribbing
(this is the lower part of the muzzle).
The top of the muzzle ends 4 rows higher.
Lightly stuff.
Sew ears 3 rows down from the top.
Start sewing one side at row 4 and finish at row 9.