Newborn Size (customizable to larger sizes)
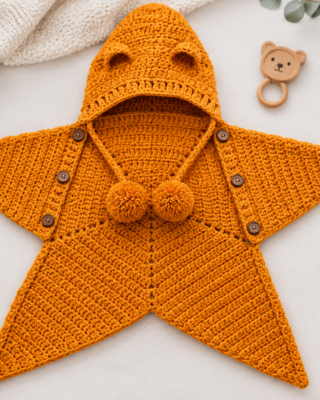
Materials
- DK weight / medium weight 4-ply yarn — approx. 200 g for a newborn blanket
- 4.0 mm (G/6) crochet hook
- Yarn needle, scissors, measuring tape
Gauge: 4 dc x 2 rows = 1 inch (with 4.0 mm hook and 4-ply yarn)
Abbreviations
- c. – crochet
- ch. – chain
- sc – single crochet
- hdc – half double crochet
- dc – double crochet
- sts./st. – stitch(es)
- sl st. – slip stitch
- sc tog – single crochet 2 together
- hdc tog – half double crochet 2 together
- dc tog – double crochet 2 together
- FPdc – front post double crochet
- BPdc – back post double crochet
Pattern written in US terms.
Suggested Finished Blanket Sizes
- Newborn: approx. 20–22 in
- 0–3 months: approx. 22–24 in
- 3–6 months: approx. 24–26 in
- 6–12 months: approx. 26–28 in
- Toddler: approx. 30–34 in
Measure your work as you go rather than relying only on row count, since yarn and tension vary.
PART 1: Front & Back Panels — Star Center
Make two star panels (one front, one back), starting from the center.
Row 1 (center ring)
Chain 5 and join into a ring. Ch 2 (doesn’t count as a stitch). *3 dc, ch 1* — repeat from * to * a total of 5 times into the ring. Slip stitch to join into the first dc, then slip stitch into the next middle of the ch-1 corner space.
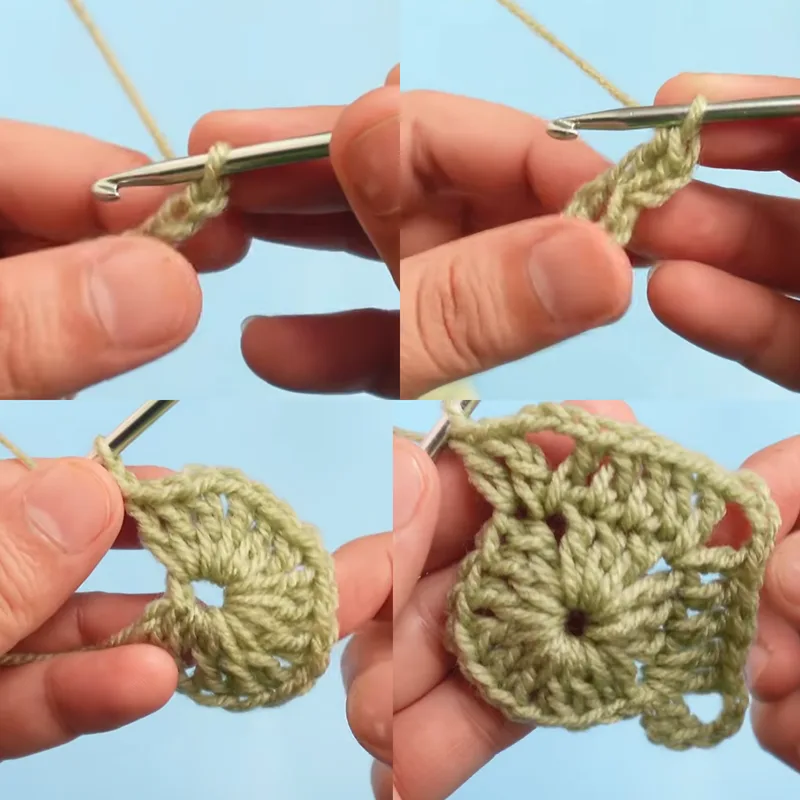
You now have 5 corners, forming a pentagon/star shape.
Rows 2–10: Increase Rounds
Each increase round follows the same structure — only the number of stitches between corners changes. In each corner: ch 2 (doesn’t count), dc, ch 3, dc into the middle of the corner space. Along each side: work the stated number of dc into the sts from the round below, then repeat the corner. Join with a sl st at the end of each round, then sl st into the next corner space to begin the following round.
| Row | Stitches between corners |
|---|---|
| Row 2 | 3 dc |
| Row 3 | 5 dc |
| Row 4 | 7 dc |
| Row 5 | 9 dc |
| Row 6 | 11 dc |
| Row 7 | 13 dc |
| Row 8 | 15 dc |
| Row 9 | 17 dc |
| Row 10 | 19 dc |
At the end of Row 10, measure edge to edge: approx. 11 in / 28 cm for newborn size.
To make other sizes, keep repeating the increase round (following the same pattern of adding 2 dc between corners each row):
- 0–3 months: 11 rows total
- 3–6 months: 12 rows total
- 6–9 months: 14 rows total
- 9–12 months: 15 rows total
At the last row, you should have 21 dc on each side for the newborn size (this is the stitch count you’ll use in Part 2).
PART 2: Shaping — Decrease Rows (worked separately on each of the 5 sides)
Side 1
Join yarn into a dc stitch along Side 1.
- Row 1 (Dec): Ch 2, skip same stitch, dc into next st to make together (dc2tog), dc in each st across, at the end make 2 dc together, turn. (19 dc)
- Row 2 (Dec): Ch 2, skip same st, dc into next st to make together, dc in each st across, at the end make 2 dc together, turn. (17 dc)
- Row 3: Repeat Row 2. (15 dc)
- Row 4: Repeat Row 2. (13 dc)
- Row 5: Repeat Row 2. (11 dc)
- Row 6: Repeat Row 2. (9 dc)
- Row 7: Repeat Row 2. (7 dc)
- Row 8: Repeat Row 2. (5 dc)
- Row 9: Repeat Row 2. (3 dc)
- Row 10: Repeat Row 2. (1 dc)
Fasten off.
Sides 2, 3, 4, and 5 (Back Panel)
Repeat the exact same 10-row decrease pattern from Side 1 on each remaining side of the back panel.
PART 3: Back Panel Edging
Around the entire back panel:
*1 sc into the top of the stitch at the side, then 20 sc along the side of the edging from top to bottom. In the corner, work 3 sc together into the middle ch-3 of the corner. Then 20 sc along the next side of the edging from bottom to top.*
Repeat from * to * all the way around the back panel. Fasten off.
PART 4: Front Panel
For the front panel, work the decrease rows (Part 2) on 3 of the 5 sides, exactly as done for the back panel. Leave 2 sides open — these become the neckline/button band and the hood.
Side 4: Buttonhole Band
Join yarn to the 1st dc stitch along this side.
- Ch 2 (doesn’t count).
- Dc into next st.
- Ch 1, skip a st (1st buttonhole).
- Dc in each of the next 7 sts.
- Ch 1, skip a st (2nd buttonhole).
- Dc in each of the next 7 sts.
- Ch 1, skip a st (3rd buttonhole).
- Dc in each of the next 2 sts.
Fasten off.
Side 4: Button Band (opposite edge)
- Row 1: Chain 31. Dc into the 4th chain from the hook, then dc in each stitch across. Turn.
- Rows 2–10: Repeat the same decrease pattern used for Side 1 in Part 2.
- Work the sc edging along this piece exactly as done for the back panel. Fasten off.
Side 5: Hood
- Chain 40 + 2 turning chains (42 total).
- Row 1: Dc into the 3rd chain from the hook, then 1 dc in each chain across. Turn. (40 dc)
- Row 2 (ribbing): Ch 1 (doesn’t count). Hdc into the same stitch. *FPdc into next dc, BPdc into next dc* — repeat from * to * across. Hdc into the last stitch. Turn. (40 sts)
- Row 3 (Dec): Ch 2, skip same st, dc into next st together (dc2tog), then dc2tog one more time. Dc in each st across. At the end, dc2tog two times. Turn. (36 dc)
- Row 4: Repeat Row 3. (32 dc)
- Row 5: Repeat Row 3. (28 dc)
- Row 6: Repeat Row 3. (24 dc)
- Row 7: Repeat Row 3. (20 dc)
- Row 8: Repeat Row 3. (16 dc)
- Row 9: Repeat Row 3. (12 dc)
- Row 10: Repeat Row 3. (8 dc)
- Row 11: Repeat Row 3. (4 dc)
- Row 12: Repeat Row 3. (1 dc)
Work the sc edging along the hood exactly as done for the back panel. Fasten off.
PART 5: Front Panel Edging
Work the same edging as the back panel around the 3 finished sides of the front panel:
*1 sc into the top of the stitch at the side, 20 sc along the side of the edging top to bottom, 3 sc together in the middle ch-3 of the corner, 20 sc along the other side bottom to top*, repeating around the 3 sides.
Then work 1 sc into each stitch across the neck edging (the open head-side edge).
PART 6: Assembly
- Place the front and back panels together with right sides facing out.
- Join the two panels around the edges by working slip stitches through both layers, stitch by stitch, all the way around.
- Attach the hood to the open neckline edge of the blanket the same way.
- Fasten off and weave in all ends.
PART 7: Tie Lace and Pom-Poms
- Chain 80.
- Work a sl st into each chain across to form a simple tie cord. Fasten off.
- Weave the lace through the front-post and back-post ribbing stitches of the hood (Row 2 of the hood).
- Make 2 pom-poms and attach one to each end of the tie lace.
- Fasten off and weave in all remaining ends.
Your Baby Star Blanket / Sleep Sack is now finished!
note: your finished size may differ from the pattern’s due to individual crochet tension — adjust your hook size if your blanket comes out too small or too large.