Looking for a cute and cozy crochet project to welcome the fall season? These Crochet Pumpkin Coasters are a fun and easy way to add a little autumn charm to your home.
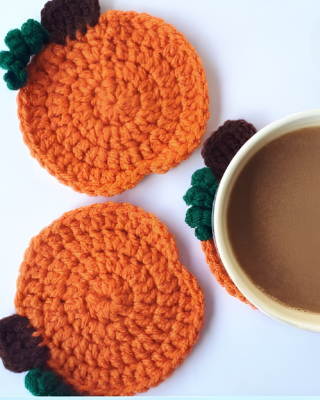
With their adorable pumpkin shape and warm seasonal feel, they’re perfect for decorating your coffee table, dining table, or kitchen. You can make a few in different shades of orange, cream, brown, or your favorite fall colors to create a beautiful handmade set.
Whether you’re looking for a quick weekend project or a simple crochet idea to use up some leftover yarn, these pumpkin coasters are a lovely project to try. Grab your hook and yarn, and let’s bring a little handmade fall coziness to your home!
Materials
- Red Heart Super Saver yarn in Pumpkin (orange), for the pumpkin body
- Small amount of Red Heart Super Saver in Cafe Latte (brown), for the stem
- Small amount of Red Heart Super Saver in Spring Green, for the curly vine
- Size H (5 mm) crochet hook
- Yarn needle, scissors
Abbreviations
- ch – chain
- sc – single crochet
- hdc – half double crochet
- dc – double crochet
- sl st – slip stitch
- st(s) – stitch(es)
- MC – magic ring/circle
This is just the first 3 rounds of the full pumpkin square pattern (originally used in a pumpkin patch blanket), turned into a small standalone coaster.
Part 1: Pumpkin Body

Use the pumpkin (orange) yarn and your H/5 mm hook.
- Round 1: Make a magic ring. Chain 2 (counts as first dc), then work a total of 16 dc into the ring. Pull the ring tight to close, then join with a sl st into the first dc.
- Chain 2.
- Round 2: Work 2 dc into each stitch around (32 dc total). Join with a sl st into the first dc.
- Chain 2.
- Round 3: This round shapes the pumpkin’s ridges and the indent at the bottom, worked as follows:
- [2 dc, 1 dc] into the next 2 stitches — repeat this sequence a total of 6 times (this means: 2 dc in one stitch, then 1 dc in the next stitch, six times over).
- Next, create the bottom indent: work 2 hdc all in one stitch, then 1 sc into each of the next 2 stitches, then 2 hdc into the next stitch, then 1 dc into the next stitch.
- Return to the [2 dc, 1 dc] sequence and repeat it 6 more times.
- You should have 3 stitches remaining — work 1 sc into each of these last 3 stitches.
- Join with a sl st and fasten off.
- Weave in your ends. You should now have a cute pumpkin shape with a natural dip/indent along the bottom.
Part 2: Stem
Switch to the brown (Cafe Latte) yarn.
- Find the 3 single crochet stitches you made at the top of Round 3 (from the indent section) — you’ll work into these.
- Join the brown yarn in the first of those 3 stitches. Chain 2, then work: 1 dc in the first stitch, 1 dc in the next stitch, 1 dc in the last stitch.
- Chain 2, then join back down to the bottom of the stitch you started in to neatly finish off the stem.
- Fasten off and weave in the ends.
Part 3: Curly Vine
Switch to the spring green yarn.
- Make a slipknot and chain 10 (you can make this shorter or longer by adjusting your starting chain length).
- Starting in the 2nd chain from the hook, work 2 sc into each chain all the way down the length of the chain.
- This will automatically cause the strip to curl into a coil on its own — no shaping tricks needed, just 2 sc in every chain stitch.
- Fasten off.
Part 4: Assembly
- Thread your yarn needle with the tail from the vine.
- Attach the coiled vine to the small space near the stem at the top of the pumpkin.
- Pull the strand through and knot it securely a few times to attach it (you can weave the end in on the back afterward, or simply knot and trim).
Your mini pumpkin coaster is complete!
Ideas for Using These
- Use as coasters — they’re sized perfectly to fit under a regular mug
- String several together as festive bunting or garland
- Attach to a mantle display for fall decor
- Sew two together back-to-back to make a tiny stuffed pumpkin plushie
Pattern adapted from a video crochet tutorial by Sarah of Repeat Crafter Me, based on her original crochet pumpkin patch blanket square design.