If you’ve ever wished for a project that’s equal parts adorable, quirky, and irresistibly squishy — you’re in the right place. Meet Monstrik Labubu, the sweetest little bunny monster you’ll ever crochet. With tiny toes, expressive eyes, and a fluffy hood complete with long ears, this character is absolutely full of personality.
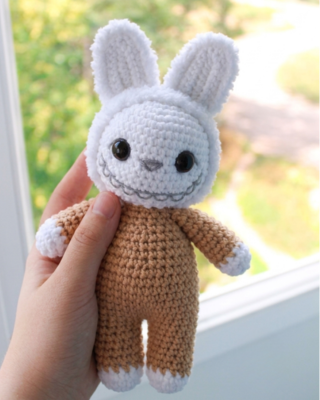
This design combines two types of yarn for extra charm and texture. The smooth cotton yarn creates beautiful stitch definition for the face, hands, and feet, while the fluffy plush yarn gives the body and hood that cozy, cuddly finish. The contrast makes the details pop — and trust me, once you feel that soft texture, you won’t want to put it down.
Don’t let the detailed shaping intimidate you. If you’re comfortable with basic amigurumi techniques like working in continuous rounds, increasing, decreasing, and simple assembly, you’ll do just fine. The shaping is thoughtfully structured and flows naturally from one section to the next. The toes and thumb detail add so much character, and they’re easier than they look!
One of the most satisfying parts of this pattern is watching the personality come to life during the face shaping. A little embroidery goes a long way here — whether you add eyelashes, eyebrows, tiny teeth, or keep the expression simple and sweet. Each small change creates a completely different mood. You might start by making just one… and then suddenly realize you need a whole collection in different colors.
The hood construction is especially fun. It’s crocheted separately and then continued directly on the head for a snug, polished fit. When it all comes together, it feels a bit magical — like dressing your tiny monster for a woodland adventure.
Take your time with stuffing, especially around the neck area. A firmly stuffed neck will help your monster hold its head up proudly instead of flopping forward. Small detail, big difference.
So grab your hooks, prepare your yarn, and settle into your favorite cozy spot. Monstrik Labubu is ready to come to life in your hands — and I have a feeling this charming little bunny monster will steal your heart before you even sew on the ears.
Abbreviations
- MR – magic ring
- sc – single crochet
- hdc – half double crochet
- dc – double crochet
- inc – increase
- dec – decrease
- sl st – slip stitch
- ch – chain
Tools and Materials
- Crochet hooks 2.5 mm (for cotton yarn) and 3 mm (for fluffy yarn)
- 13 mm safety eyes
- Scissors
- Stitch markers
- Sewing needle
- YarnArt Jeans yarn and Alize Softy yarn
- Stuffing (I use holofiber)
Legs–Body
Using YarnArt Jeans yarn:
Ch 6. Starting in the 2nd chain from hook:
Rnd 1: 4 sc, 3 sc in last stitch, 4 sc (11)
Rnd 2: 4 sc, 3 inc, 4 sc (14)
Rnd 3: 4 sc, sl st, (3 dc together in one stitch, sl st) ×3, 3 sc (14)
Shape the toes well (where you made 3 dc together).
Rnd 4: 14 sc
Change yarn to Alize Softy.
Rnd 5–10: 14 sc (6 rounds)
For the first leg: sl st, fasten off, cut yarn.
For the second leg: crochet 6 more sc, ch 1, join to the middle of the first leg with sl st. Make sure the legs face forward.
Continue crocheting the body. The beginning of the round should be at the back.
Rnd 11: 14 sc on first leg, 1 sc in ch, 14 sc on second leg, 1 sc in ch (30)
Rnd 12: (4 sc, inc) ×6 (36)
Rnd 13: (5 sc, inc) ×6 (42)
Rnd 14–20: 42 sc (7 rounds)
Stuff the legs and body firmly as you go.
Rnd 21: (5 sc, dec) ×6 (36)
Rnd 22: 36 sc
Rnd 23: (4 sc, dec) ×6 (30)
Rnd 24: (3 sc, dec) ×6 (24)
Rnd 25: (2 sc, dec) ×6 (18)
Rnd 26: 18 sc
Fasten off, cut yarn, and leave a long tail for sewing.
Head
Using YarnArt Jeans:
Rnd 1: 6 sc in MR
Rnd 2: 6 inc (12)
Rnd 3: (1 sc, inc) ×6 (18)
Rnd 4: (2 sc, inc) ×6 (24)
Rnd 5: (3 sc, inc) ×6 (30)
Rnd 6: (4 sc, inc) ×6 (36)
Rnd 7: (5 sc, inc) ×6 (42)
Rnd 8: (6 sc, inc) ×6 (48)
Rnd 9–16: 48 sc (8 rounds)
Insert safety eyes between Rnds 12 and 13, with 7 sc between them.
Rnd 17: (6 sc, dec) ×6 (42)
Rnd 18: (5 sc, dec) ×6 (36)
Rnd 19: (4 sc, dec) ×6 (30)
Stuff the head firmly as you go.
Rnd 20: (3 sc, dec) ×6 (24)
Rnd 21: (2 sc, dec) ×6 (18)
Rnd 22: (1 sc, dec) ×6 (12)
Rnd 23: 6 dec
Cut yarn, leave a long tail, close the opening, and hide the yarn inside the head.
Face Shaping
You can shape the face right away:
- Create eye indentations using your preferred method.
- Embroider the eye whites, eyelashes, optional eyebrows, nose, smile, and teeth.
Hood
Using Alize Softy:
Rnd 1: 6 sc in MR
Rnd 2: 6 inc (12)
Rnd 3: (1 sc, inc) ×6 (18)
Rnd 4: (2 sc, inc) ×6 (24)
Rnd 5: (3 sc, inc) ×6 (30)
Rnd 6: (4 sc, inc) ×6 (36)
Rnd 7: (5 sc, inc) ×6 (42)
Rnd 8: (13 sc, inc) ×3 (45)
Rnd 9–15: 45 sc (7 rounds)
Place the hood on the head and continue crocheting:
Rnd 16: (13 sc, dec) ×3 (42)
Fasten off, cut yarn, leave a long tail, and sew the hood to the head.
Arms (Make 2)
Using YarnArt Jeans:
Rnd 1: 6 sc in MR
Rnd 2: 6 inc (12)
Rnd 3: 12 sc
Rnd 4: 3 dc together in one st, 11 sc (12)
Shape the thumb area well (where you made 3 dc together in one stitch).
Change yarn to Alize Softy.
Rnd 5–13: 12 sc (9 rounds)
Stuff halfway.
On the first arm, crochet 3 additional sc.
On the second arm, do not crochet the last 3 sc.
Fold the piece in half and crochet 6 sc through both layers.
Fasten off, cut yarn, and leave a long tail for sewing.
Ears (4 Pieces)
First Piece
Using YarnArt Jeans in an additional color (white in my version):
Ch 9. Starting in the 2nd ch from hook:
Row 1: 8 hdc, change to main color (beige in my version), ch 1, turn
Row 2: In 2nd ch from hook: 7 sc, 3 sc in last st, 7 sc, ch 1, turn
Row 3: In 2nd ch from hook: 7 sc, 3 inc, 7 sc
Fasten off, cut yarn.
Second Piece
Using Alize Softy:
Ch 8. Starting in the 2nd ch from hook:
Row 1: 7 sc, ch 1, turn
Row 2: In 2nd ch from hook: 6 sc, 3 sc in last st, 6 sc, ch 1, turn
Row 3: In 2nd ch from hook: 6 sc, 3 inc, 6 sc
Do not cut the yarn. Place the first piece onto the second piece (wrong sides together) and work sc around through both layers.
Fasten off, cut yarn, and leave a long tail for sewing.
Make the second ear the same way.
Assembly
- Sew the ears to the head.
- Sew the head to the body. Stuff the neck area firmly.
- Sew the arms one round below the head–body join.