Crochet Girl Bonnet
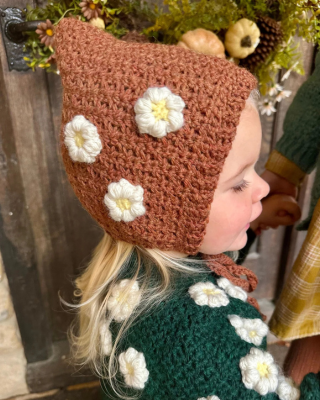
In this post, you’ll discover how to create a beautifully textured baby bonnet using the Daisy Bonnet crochet pattern. This pattern includes detailed, step-by-step instructions and a full video tutorial designed to guide you through every part of the project, from shaping the main body to adding the ribbing and finishing edges. Starting with a simple foundation, the tutorial demonstrates key crochet techniques including half double crochet and v-stitch construction, and explains how to work in rows to achieve a snug and comfortable fit. Whether you’re a beginner or an experienced crocheter, you’ll appreciate the clear visual guidance paired with the written pattern for a smooth, enjoyable crafting experience
Pattern comes in sizes 0-3 months, 3-6 months, 6-12 months, 1-2 years & 3-5 years.
The Daisy Bonnet has been designed as part of my Daisy Collection and is perfect for a beginner to crochet. The bonnet features a half double crochet v-stitch pattern that forms a very modern crochet texture. The piece is stitched in a flat rectangle and then sewed at the back to form the bonnet.
Materials:
*5.0mm (U.S H/8) crochet hook or size needed to obtain gauge.
*Aran yarn. I used Cascade 220 in Pumpkin Spice for the bonnet. For the flowers I used Butter & Natural. 200m/219yds/100g per skein.
*tapestry needle
Gauge:
17sts/ 16rows= 10cmX10cm (4X4 inch) in half double crochet v-stitch, explanation in pattern notes.
- Stitches and abbreviations used:
- BLO- back loop only
- ch- chain
- hdc- half double crochet
- hdc2tog- half double crochet two together
- sc- single crochet
- sk- skip
- sl st- slip stitch
- st or sts- stitch or stitches
- RS- right side
- WS- wrong side
The video tutorial guides you through the process of crocheting a baby bonnet from start to finish using clear and easy-to-follow steps. It begins by showing how to create the initial foundation and explains how the main shape of the bonnet is built gradually using rows. The instructor focuses on maintaining an even texture and consistent sizing as the piece grows
Next, demonstrates how to shape the bonnet to fit comfortably around the baby’s head. You’ll see how the back of the bonnet is formed and how the overall structure comes together, creating a soft and flexible fit. The tutorial highlights smooth transitions between sections to ensure a neat and professional appearance.
As the project progresses, the video explains how to finish the edges and add structure to the opening of the bonnet. This step helps improve both comfort and durability while giving the bonnet a clean, polished look. The tutorial also shows how to prepare the bonnet for final assembly.
video tutorial demonstrates how to create the squares, assemble them into a hat shape, and add finishing touches.