Waffle gnome free pattern
Spread the loveThis Waffle Gnome crochet pattern has been simmering in my sketchbook for months now, and I’m so excited to finally share it! My goal was to create a fun, whimsical gnome with as little sewing as possible. I experimented with lots of prototypes—some with attached waffles, some with separate pieces—but it never quite…

This Waffle Gnome crochet pattern has been simmering in my sketchbook for months now, and I’m so excited to finally share it!
My goal was to create a fun, whimsical gnome with as little sewing as possible. I experimented with lots of prototypes—some with attached waffles, some with separate pieces—but it never quite captured the cozy, sweet look I was aiming for
Materials needed
- YarnArt Jeans, 55% cotton, 45% acryl, 50g/160m,next colors:
- for body – beige color №07
- for hat – milk color №51
- for berries – purple color № 50, pink color № 20
- for leaf – green color № 69
- For nose – nude color № 05
- Natural wool for braids.
- Crochet hook 2 mm or 2.25 mm (US: B, UK:14)
- Holofiber, thick sewing needle, pins.
- Piece of cardboard 4 on 4 inch for one gnome’s base.
If you follow this advice your gnome will be 20 cm
Yarn tip: cotton/acryl or cotton 100%
Abbreviations:
ch – chain stitch
st – stitch
sc – single crochet
hdc – half double crochet
dc – double crochet
tr – treble crochet
sl st – slip stitch
inc – increase, 2 sc in the next sc
dec – decrease, sc2tog, single crochet 2 stitches
together
(16) – number of stitches in a round
(inc, sc)*N – repeat N times
FPdc – front post double crochet
BPdc – back post double crochet
BLO – back loop only
but honestly, I’m thrilled with how this little breakfast buddy turned out. I hope you love making him as much as I loved designing him!
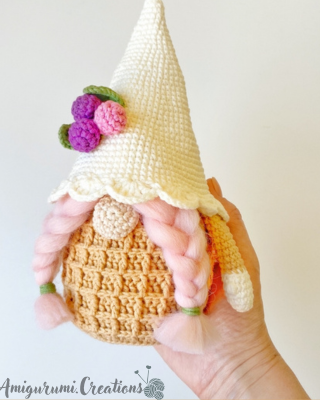
Waffle gnome
- Natural wool for braids.
- Crochet hook 2 mm or 2.25 mm (US: B, UK:14)
- Holofiber, thick sewing needle, pins.
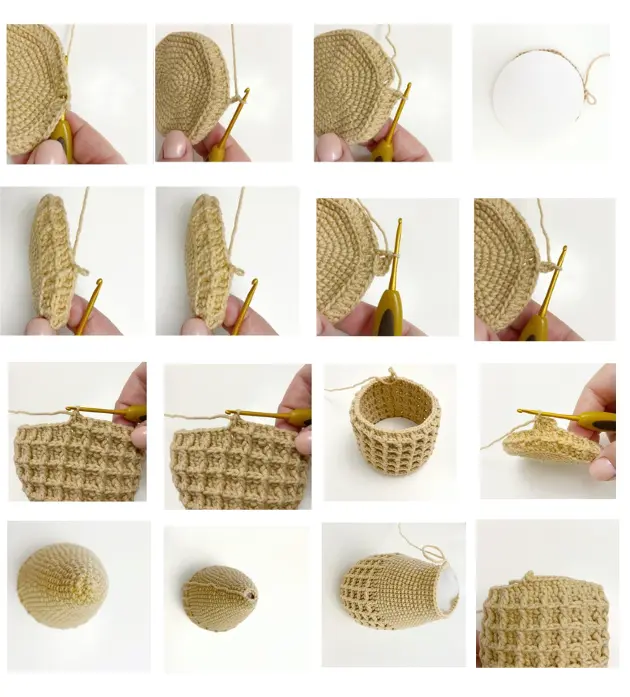
Body.
With milk yarn.
Start with making a round base. Work in
continuous rounds without slip
stitches.
Rnd 1: 7 sc in the MR
Rnd 2: 7 inc (14)
Rnd 3: (inc, sc)7 (21) Rnd 4: (inc, 2 sc)7 (28)
Rnd 5: (inc, 3 sc)7 (35) Rnd 6: (inc, 4 sc)7 (42)
Rnd 7: (inc, 5 sc)7 (49) Rnd 8: (inc, 6 sc)7 (56)
Rnd 9: (inc, 7 sc)*7 (63) and crochet 1
sl st more
Сut the base of cardboard.
Go on working in rounds
stitches.
with slip
Attention! This part of waffle crochet
stitch you should crochet with tight
stitches.
Rnd 10: ch 2, BLO 63 dc
Rnd 11: ch 2 (counts as 1st dc), 2 BPdc
in next 2 stitches, *dc, 2 BPdc in next
2 stitches, repeat from *(63)
Rnd 12: ch 2 (counts as 1st FPdc), 2
dc, * FPdc, 2 dc, repeat from *(63)
Next we repeat 5 times the pattern 11
and 12 rounds.
Rnd 13: ch 2 (counts as 1st dc), BPdc in
next 2 stitches, *dc, BPdc in next 2
stitches, repeat from * (63)
Rnd 14: ch 2 (counts as 1st FPdc), 2
dc, * FPdc, 2 dc, repeat from * (63)
Rnd 15: ch 2 (counts as 1st dc), BPdc in
next 2 stitches, *dc, BPdc in next 2
stitches, repeat from * (63)
Rnd 16: ch 2 (counts as 1st FPdc), 2
dc, * FPdc, 2 dc, repeat from * (63)
Rnd 17: ch 2 (counts as 1st dc), BPdc in
next 2 stitches, *dc, BPdc in next 2
stitches, repeat from * (63)
Rnd 18: ch 2 (counts as 1st FPdc), 2
dc, * FPdc, 2 dc, repeat from * (63)
Rnd 19: ch 2 (counts as 1st dc), BPdc in
next 2 stitches, *dc, BPdc in next 2
stitches, repeat from * (63)
Rnd 20: ch 2 (counts as 1st FPdc), 2
dc, * FPdc, 2 dc, repeat from * (63)
Rnd 21: ch 2 (counts as 1st dc), BPdc in
next 2 stitches, *dc, BPdc in next 2
stitches, repeat from * (63)
Rnd 22: ch 2 (counts as 1st FPdc), 2
dc, * FPdc, 2 dc, repeat from * (63)
Next working in continuous rounds
without slip stitches.
Rnd 23-24: 63 sc
Insert the cardboard base.
Rnd 25: (dec, 19 sc)3 (60) Rnd 26: (dec, 13 sc)4 (56)
Rnd 27: 56 sc
Rnd 28: 6 sc,(dec, 12 sc)3, dec, 6 sc (52) Rnd 29: 52 sc Rnd 30: (dec, 11 sc)4 (48)
Rnd 31: 48 sc
Rnd 32: 5 sc,(dec, 10 sc)3, dec, 5 sc (44) Rnd 33: 44 sc Rnd 34: (dec, 9 sc)4 (40)
Rnd 35: 40 sc
Rnd 36: 4 sc,(dec, 8 sc)3, dec, 4 sc (36) Rnd 37: 36 sc Stuff the body evenly and firmly with the holofiber. Rnd 38: (dec, 7 sc) (32)
Rnd 39: 32 sc
Rnd 40: 3 dc, (dec, 6 sc)*3, dec, 3 sc (28)
Rnd 41: 28 sc
Rnd 42: (dec, 5 sc)*4 (24)
Rnd 43: 24 sc
Rnd 44: 2 sc,(dec, 4 sc)3, dec, 2 sc (20) Rnd 45: 20 sc Rnd 46: (dec, 3 sc)4 (16)
Rnd 47: 16 sc
Rnd 48: 8 dec (8)
Cute the yarn, leave a long end.
Add some more holofiber. Close the top using a needle,
tie off and hide the end into the body.
Hat.
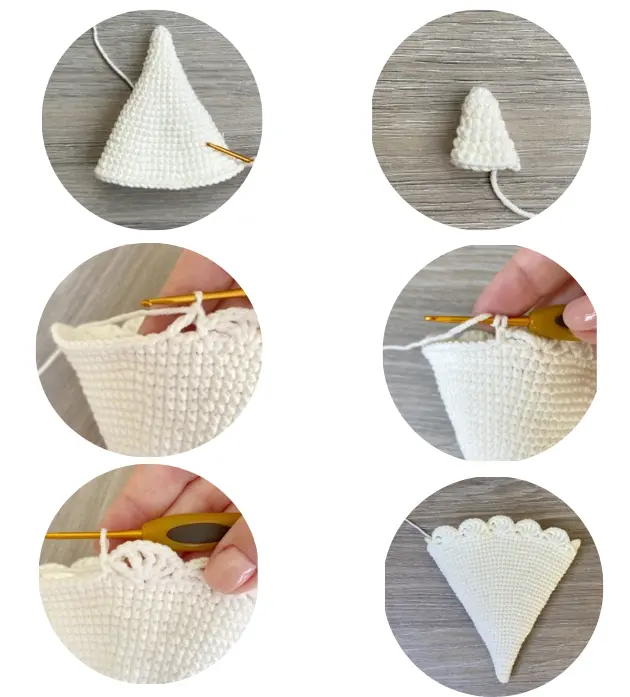
With milk yarn.
Work in continuous rounds without slip stitches.
Rnd 1: 6 sc in the MR
Rnd 2: (inc, sc)3 (9) Rnd 3: 9 sc Rnd 4: (inc, 2 sc)3 (12)
Rnd 5: 12 sc
Rnd 6: (inc, 2 sc)4 (16) Rnd 7: 16 sc Rnd 8: (inc, 3 sc)4 (20)
Rnd 9: 20 sc
Rnd 10: 2 sc,(inc, 4 sc)3, inc, 2 sc (24) Rnd 11: 24 sc Rnd 12: (inc, 5 sc)4 (28)
Rnd 13: 28 sc
Rnd 14: 3 sc,(inc, 6 sc)*3, inc, 3 sc (32) Rnd 15: 32 sc
Rnd 16: (inc, 7 sc)4 (36) Rnd 17: 36 sc Rnd 18: 4 sc,(inc, 8 sc)3, inc, 4 sc (40)
Rnd 19: 40 sc
Rnd 20: (inc, 9 sc)4 (44) Rnd 21: 44 sc Rnd 22: 5 sc,(inc, 10 sc)3, inc, 5 sc (48)
Rnd 23: 48 sc
Rnd 24: (inc, 11 sc)*4 (52)
Rnd 25: 52 sc
Rnd 26: 6 sc,(inc, 12 sc)3, inc, 6 sc (56) Rnd 27: 56 sc Rnd 28: (inc, 13 sc)4 (60)
Rnd 29: 60 sc
Rnd 30: 7 sc,(inc, 14 sc)3, inc, 7 sc (64) Rnd 31: 64 sc
Rnd 32: (inc, 15 sc)*4 (68)
Rnd 33: 68 sc Rnd 34: 8 sc,(inc, 16 sc)3, inc, 8 sc (72) Rnd 35: 72 sc Rnd 36: (inc, 17 sc)4 (76)
Rnd 37: (37 sc, inc)*2 (78)
Rnd 38 (decoration): ch 1, * leave 2 st
tr, ch1, tr, ch1, tr, ch1, tr), leave 2
st previous round, sc, repeat from *
Cute the yarn, hide the end.
Arms.
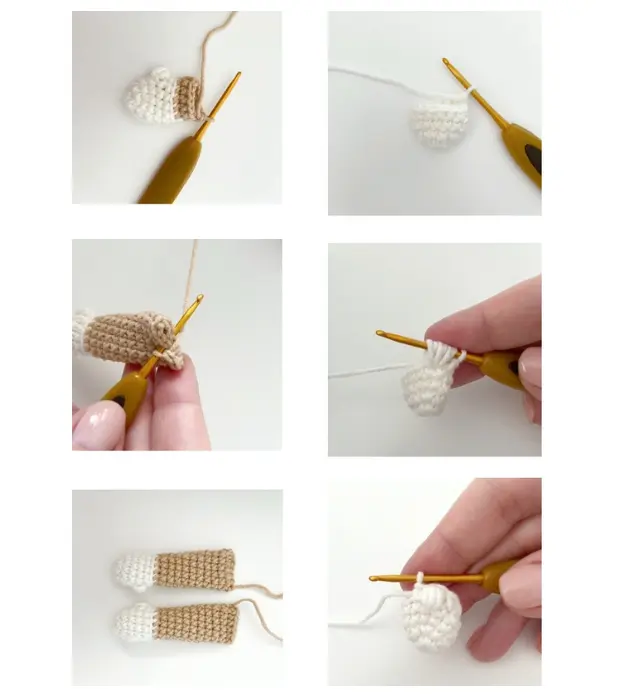
Start with the milk yarn.
Rnd 1: 6 sc in the MR, go on in
continuous rounds without slip
stitches.
Rnd 2: 6 inc (12)
Rnd 3: 12 sc
Rnd 4: 12 sc
Rnd 5: 5 sc, 1 puff stitch, 6 sc (13)
Rnd 6: 5 sc, dec (two stitches of puff
stitch), 5 sc (12)
Connect beige yarn.
Rnd 7: BLO 12 sc
Rnd 8-16: sc in each stitch around 9
rounds.
Then squeeze the hole of the hand so that
the stitches of the last round line each
other.
Crochet the opposite stitches with 5-6
sc.
Cut the yarn, leave a long end for
sewing.
Do not stuff the arms, otherwise they
will stick up.
Repeat the same for the second arm.
Nose.
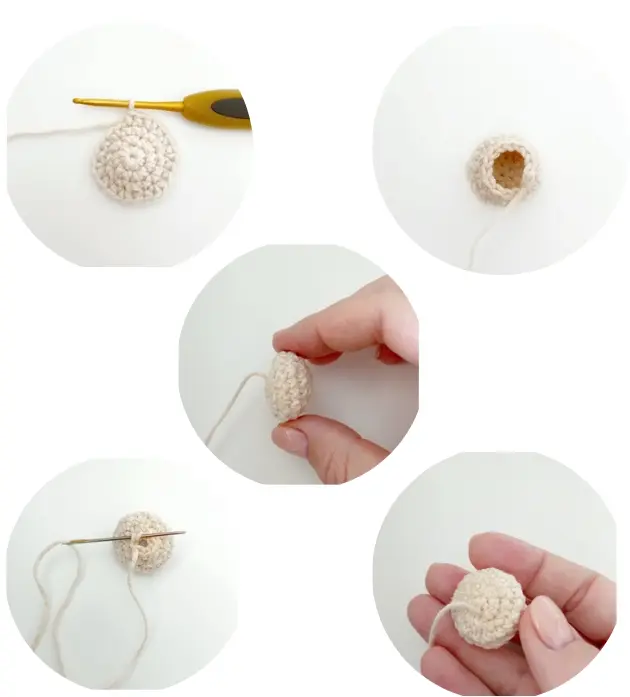
With nude yarn.
Rnd 1: 6 sc in the MR, go on in
continuous rounds without slip
stitches.
Rnd 2: 6 inc (12)
Rnd 3: (inc, 1 sc)6 (18) Rnd 4: (inc, 2 sc)6 (24)
Rnd 5: (dec, 6 sc)3 (21) Rnd 6: (dec, 1 sc)7 (14)
Rnd 7: 7 dec (7)
Cute the yarn, leave a long end. Add
some holofiber.
Close the top using a needle.
Leaves for decoration.
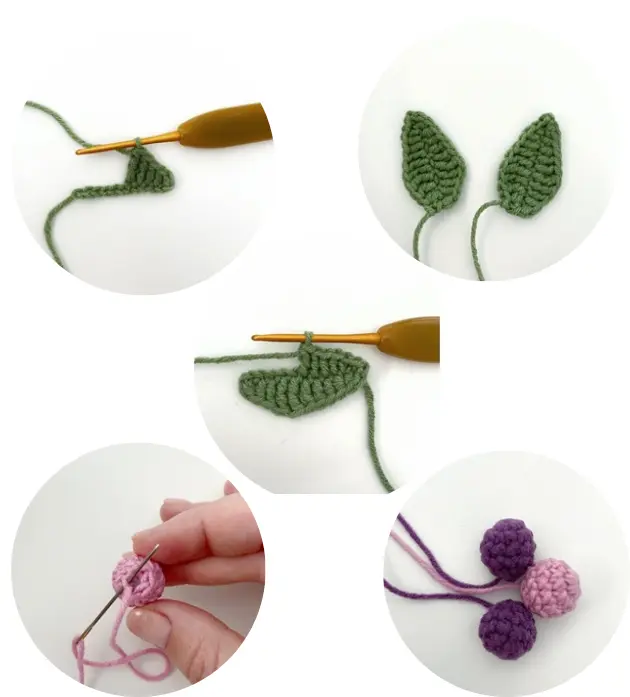
Leaves for decoration. look image With green yarn. Crochet 2 leaves.
Chain 12, start with the 2nd loop from the hook.
1 sc, 1 hdc, 1 dc, 2 tr, 2 dc, 2 hdc, 1 sc, in last
stitch:(sl st, ch 1, 1 sl st),
work along the other side of the foundation chain: 1 sc, 2
hdc, 2 dc, 2 tr, 1 dc, 1 hds, 1 sc.
Cut the yarn, leave a long end for sewing.
Berries for decoration.
With purple and pink yarn. Crochet 3
berries.
Rnd 1: 6 sc in the MR, go on in
continuous rounds without slip
stitches.
Rnd 2: 6 inc (12)
Rnd 3-4: sc in each stitch around 2
rounds.
Rnd 5: 6 dec (6)
Cute the yarn, leave a long end. Add
some holofiber.
Close the top using a needle.
Assembly and decoration.
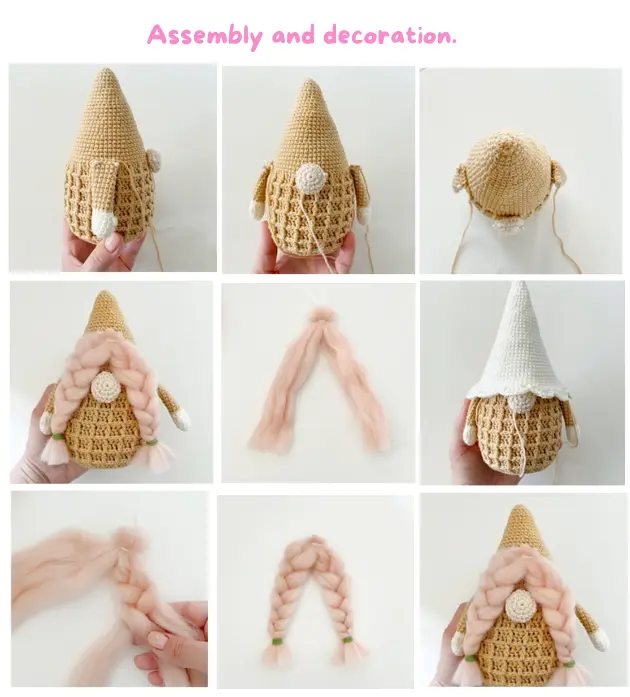
Attach the arms and
nose to the body with some pins between
24 and 25 rounds of the body.
Put on the hat. The top of arms and nose
should be placed under the hat. Move them
the way you like.
Take off the hat, sew the arms and nose
to the body.
To make a braids with the natural wool,
tie up.
Divide the wool into strands, braid the
braids, tie the ends with green yarn,
trim the ends.
Sew it up to the body, higher the nose.
Put on the hat and attach it to the body
with hidden stitches.
Sew the leaves and then sew the berries to the hat.