free mouse pattern crochet
Spread the loveYou’ll never guess what inspired my free mouse pattern crochet… 😂🐿️ The first-ever animal I designed was a squirrel. ond crochet elephant pattern I made it for my niece’s birthday (long before I had my own kids!) and gifted it to her during a cozy autumn picnic. 🐿️✨ Spend less time assembling (and…
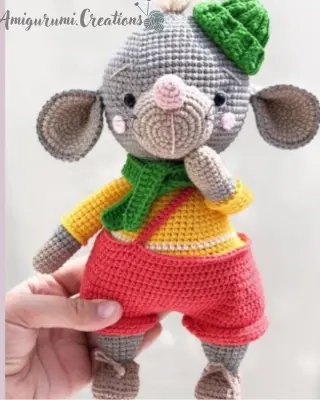
You’ll never guess what inspired my free mouse pattern crochet… 😂🐿️
The first-ever animal I designed was a squirrel. ond crochet elephant pattern I made it for my niece’s birthday (long before I had my own kids!) and gifted it to her during a cozy autumn picnic. 🐿️✨
Spend less time assembling (and more time crocheting!) 🧶
Because this was one of my first patterns, there were many things I didn’t know I didn’t know about designing amigurumi.
Materials and tools
- MR – magic ring
- SC – single crochet
- CH – chain
- I NC – increase
- DEC – decrease
- BLO – black loop only
- SL ST – slip stitch
- HDC- half double croche
- Yarn
Yarn art jeans – 71
Gazzal baby cotton – 3418
Alize cotton gold – 55
Alize cotton gold – 126
Alize cotton gold – 161
Alize cotton gold – 21
Alize cotton gold – 152
Alize cotton gold 14
2. Scissors
- Two black plastic eyes, diameter 8 mm
- Fiber filling
- Hook size 2 mm
- Tapestry needle for sewing details
free mouse pattern crochet pdf
Head
Start to crochet head with grey yarn:
- 6 sc in mr
- 6 inc (12)
- (1 sc, inc) х 6 (18)
- (2 sc, inc) х 6 (24)
- (3 sc, inc) х 6 (30)
- (4 sc, inc) х 6 (36)
- (5 sc, inc) х 6 (42)
- (13 sc, inc) х 3 (45)
- (14 sc, inc) х 3 (48)
- (7 sc, inc) х 6 (54)
- (8 sc, inc) х 6 (60)
- (9 sc, inc) х 6 (66)
- (21 sc, inc) х 3 (69)
- (22 sc, inc) х 3 (72) 15.-24. 72 sc
- (10 sc, dec) х 6 (66)
- (9 sc, dec) х 6 (60)
- (8 sc, dec) х 6 (54)
- (7 sc, dec) х 6 (48)
- (6 sc, dec) х 6 (42)
- (5 sc, dec) х 6 (36)
STUFF - (4 sc, dec) х 6 (30)
- (3 sc, dec) х 6 (24)
STUFF
Leave a long tail for sewing
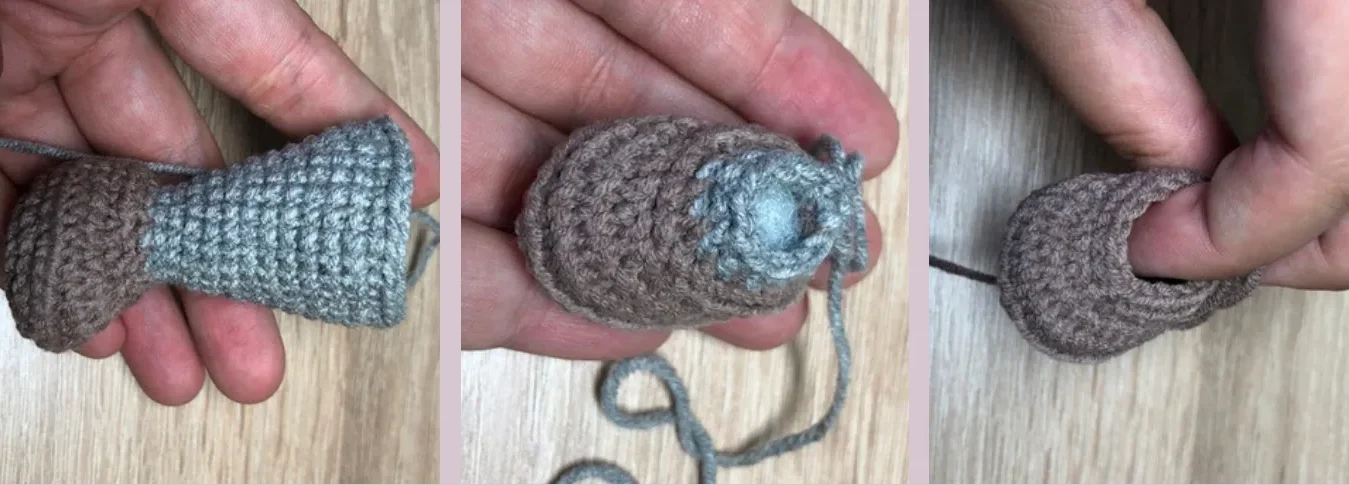
NOSE
1 6 sc in mr
2 6 inc (12)
3 (3 sc, inc) х 3 (15)
4 -5. 15 inc 6. (1 sc, dec) х 5 (10) Stuff
Leave a long tail for sewing
EARS (start to crochet 2 beige details):
- 6 sc in mr
- 6 inc (12)
- (1 sc, inc) х 6 (18)
- (2 sc, inc) х 6 (24)
- (3 sc, inc) х 6 (30)
- (4 sc, inc) Х 6 (36)
- (5 sc, inc) х 6 (42)
Tighten the opening and weave in ends
Start to crochet 2 grey details and leave a very long tail
for crochet round with beige details and brown details
together
Sew along the edges of the ears and leave a long tail for
sewing
Muzzle (start to crochet muzzle with
beige yarn):
1.6 sc in mr
2. 6 inc (12)
3. 3 inc, 3 sc, 3 inc, 3 sc (18)
4. 3 inc, 3 sc, 3 inc, 3 sc, 3 inc, 3 sc (27)
5 (1 sc, inc) х 4, 7 sc, (1 sc, inc) х4, 4 sc (35)
6 (6 sc, inc) х 5 (40)
7 (6 sc, inc) х 5 (40)
Leave a long tail for sewing
1. 6 sc in mr
2. 6 inc (12)
3. 3 inc, 3 sc, 3 inc, 3 sc (18)
4. (1 sc, inc) х 3, 3 sc, (1 sc, inc) х 3, 3 sc (24)
5. (3 sc, inc) х 6 (30)
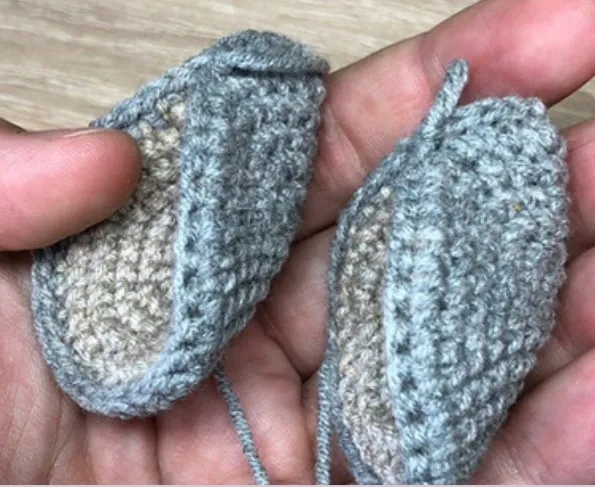
6. BLO 30 sc 7. Move the safety pin to the middle part from the heel: 9 sc, 6 dec, 9 sc
(24)
8. 6 sc, 6 dec, 6 sc (18)
9. BLO 7 sc, 4 sc, BLO 7 sc
Stuff
- Change yarn color to the coral color (1 sc, dec) х 6 (12)
- 12 sc
- (3 sc, inc) х 3 (15)
- (4 sc, inc) х 3 (18)
- 18 sc
- (5 sc, inc) х 3 (21)
- 21 sc
- (6 sc, inc) х 3 (24)
- 24 sc
- (7 sc, inc) х 3 (27)
- 27 sc
- (8 sc, inc) х 3 (30)
- 3 sc
not cut off the thread on the second leg; if
necessary, move the safety pin so that when joining
the legs both of them look in the same direction.
Continue crocheting the body.
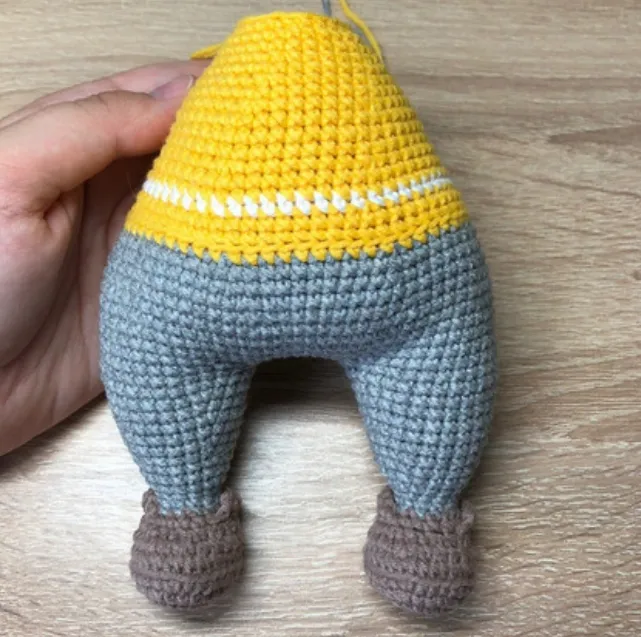
BODY
Ch 6, join first leg, place a marker, this will be first st of the row now,
and crochet:
- 30 sc on the 1st leg, 6 sc on the chain, 30sc on the 2nd leg,
6 sc on the chain again (72) - (11 sc, inc) x 6 (78)
Move the safety pin to the middle part from the body - 3.-7. 78 sc
- (11 sc, dec) х 6 (72)
- 72 sc
- (10 sc, dec) х 6 (66)
- 66 sc
- Change yarn color to the yellow color: (9 sc, dec) х 6 (60)
- BLO 60 sc
- Change yarn color to the white color: (8 sc, dec) х 6 (54)
- Change yarn color to the yellow color: 54 sc
- 54 sc
- (7 sc, dec) х 6 (48)
18.-20. 48 sc
- (6 sc, dec) х 6 (42)
- 42 sc (STUFF)
- (5 sc, dec) х 6 (36)
- 36 sc
- (4 sc, dec) х 6 (30)
26.-27. 30 sc (STUFF) - (3 sc, dec) х 6 (24) 28.(3 sc, dec) х 6 (24)
CHEEKS
6 sc in mr
- Close the ends into the ring and cut the yarn
leaving a long tail for sewing
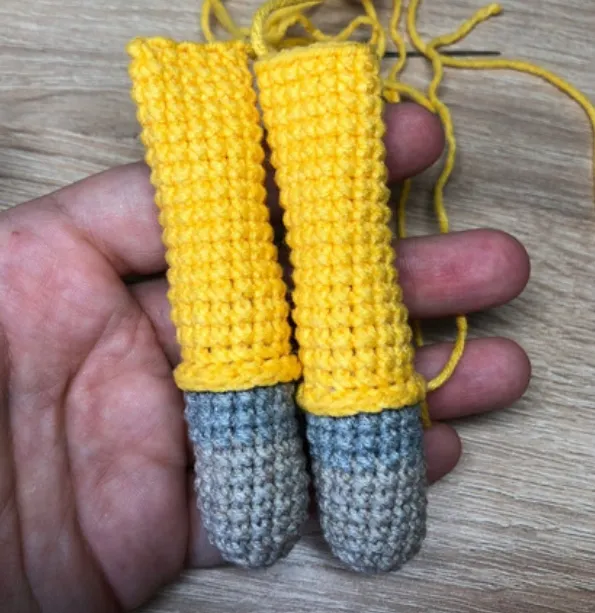
HANDS (х2)
Start to crochet hands with beige yarn:
- 6 sc in mr
- 6 inc (12)
- (3 sc, inc) х 3 (15)
4.-8. 15 sc
9.-11. Change yarn color to the grey color: 15 sc
9.-11. Change yarn color to the grey color: 15 sc
- Change yarn color to the yellow color: 15 sc
- BLO 15 sc
14.-28. 15 sc
Stuff
START FORMING THE MUZZLE:
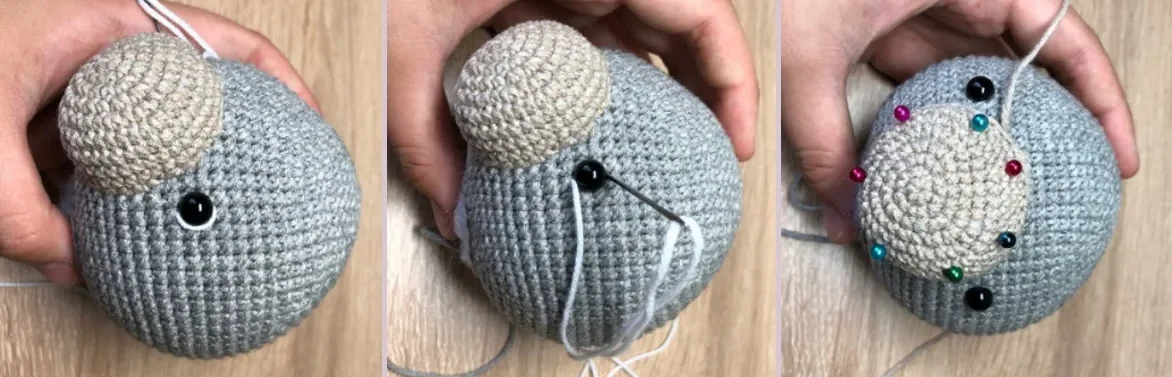
1 Between the 18th and 19th rows stick
eyes, 8 mm diameter. The gap between
the eyes should be 13-15 stitches.
- Sew on the muzzle and stuff
- Embroider eyes: insert the white threaded
needle on top of the eye and thread it to the
bottom as shown in the picture.
Bring the thread out near the second eye and
repeat the same steps. - Sew on the nose and embroider nose with
thin pink thread - Sew on the cheeks
- Sew the ears on to the head of the mouse
at eye level - Sew the head to the body
- Sew hands to the body
OVERALLS
1 40 ch and close the ends into the
ring and cut the yarn leaving a
long tail for sewing
2–3. 40 hdc
Do not cut off the thread on the
second detail.
Continue crocheting the overalls.
- Ch 6, join first detail, place a
marker, this will be first st of the row
now, and crochet: 40 1. 40 hdc on the 1st detail, 6 hdc on
the chain, 30hdc on the 2nd detail,
6 hdc on the chain again (92) - -6. 92 hdc
- (44 hdc, dec) х 2 (90)
- (28 hdc, dec) х 3 (87)
- (27 hdc, dec) х 3 (84)
- (26 hdc, dec) х 3 (81)
- (25 hdc, dec) х 3 (78)
- (24 hdc, dec) х 3 (75)
- (23 hdc, dec) х 3 (72)
14.-15. 72 hdc
Tighten the opening and weave in
ends
HAT
Work in turning rows
- 19 ch
- 18 hdc
BLO (ALL ROWS) - 1 ch, 5 sl st, 13 hdc
- 1 ch, 13 hdc, 5 sl st
REPEAT 3+4 rows 11 раз times!
Finish knitting bottom caps
Fold in half and knit together
Tighten the opening at the top of the hat using
the threaded needle. Tuck the bottom and the
hat is ready

The strap for pants
- 43 ch
- 42 sc
Sew the strap to the pant