Easy Crochet Bow Tutorial
Spread the loveLearn how to make this easy and beautiful crochet bow This beginner-friendly project is perfect for hair clips, headbands, bags, keychains, and handmade gifts. In this video tutorial, you’ll learn how to make an easy crochet bow step by step — a beginner-friendly project that’s both simple and versatile. The instructor demonstrates each…
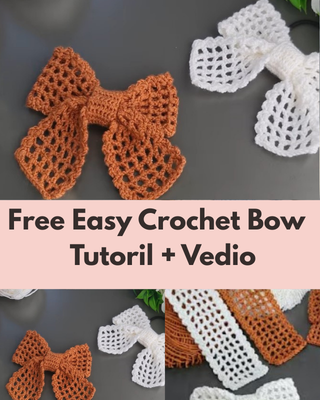
Learn how to make this easy and beautiful crochet bow This beginner-friendly project is perfect for hair clips, headbands, bags, keychains, and handmade gifts.
In this video tutorial, you’ll learn how to make an easy crochet bow step by step — a beginner-friendly project that’s both simple and versatile. The instructor demonstrates each stage visually, covering how to start your foundation, build the bow shape, and finish it neatly so it can be used for accessories like hair clips, headbands, gifts, or even to sell. Whether you’re new to crochet or looking for a quick and satisfying piece to craft, this tutorial makes the process easy to follow from beginning
- Ch = Chain
- Slst = Slip a stitch
- Sc = Single Crochet
- Half Cr = Half Crochet
- Dc = Double Crochet
- Treble Cr = Treble Crochet
- Double Treble Cr = Double Treble Crochet
- k2-tog = knit 2 stitches together
Don’t forget to browse my Amigurumi tutorials for more tips, techniques, and inspiration
Create the Foundation
- The video begins by showing how to start your crochet piece with a base chain or initial foundation that sets up the length of the bow.
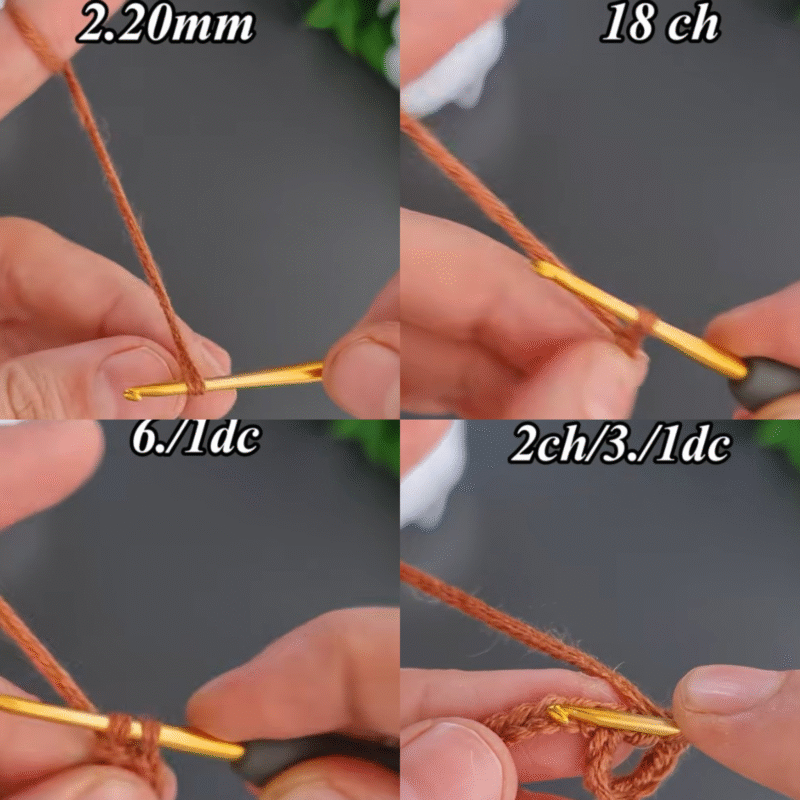
Build the Bow Shape
- Once the foundation is in place, the tutorial demonstrates how to work stitches back and forth to build out the body of the bow, shaping it evenly on both sides.
Cinch and Define
- To form the classic bow shape, the video shows how to bring the middle together using a small wrap or band, giving the piece its distinctive look.
Finishing and Versatility
- In the final section, the instructor highlights ways you can finish the bow — such as attaching it to a hair clip, headband, or other accessory. The video also shows how to secure loose ends for a neat finish.
Did you enjoy this tutorial?
• Leave a Comment: Share your thoughts and feedback in the comments section below — I’d love to hear from you!
• Save for Later: Pin this tutorial on Pinterest so you can easily find it again whenever you need it.
• Share the Love: If you found this helpful, feel free to share it on social media with fellow crochet lovers.