Crochet watermelon free pattern
Spread the loveBring a touch of summer sweetness to your crochet projects with this adorable Crochet watermelon free pattern! This fun and beginner-friendly design is perfect for using up scrap yarn and creating cute decorations, keychains, play food, or gifts. Whether you’re making it for kids, as a market item, or simply to brighten your…
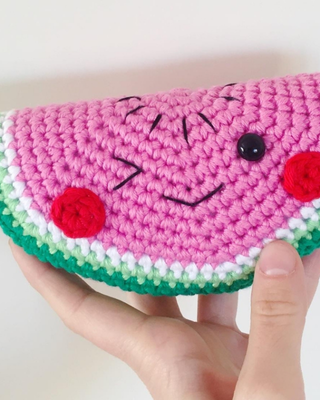
Bring a touch of summer sweetness to your crochet projects with this adorable Crochet watermelon free pattern! This fun and beginner-friendly design is perfect for using up scrap yarn and creating cute decorations, keychains, play food, or gifts.
Whether you’re making it for kids, as a market item, or simply to brighten your home, this juicy little watermelon slice works up quickly and adds a pop of cheerful color to any collection. Grab your hook and let’s crochet something fresh and fun
- ABBREVIATIONS
- ch: chain
- sc: single crochet
- 1 inc: singe crochet 2 stitches in the same stitch
- 1 dec: single crochet 2 stitches together
- sl: slip stitch
- hdc: half double crochet
Here are some helpful resources you may find useful while working through this amigurumi pattern:
• Crochet Abbreviations Guide
• US–UK Crochet Conversion Chart
You can also explore the “Tutorials” menu to find step-by-step guides. There you’ll discover:
• Basic crochet stitches commonly used in many amigurumi projects
• Detailed stitch tutorials to help you build your skills
Whether you’re a beginner or growing your amigurumi collection, these lessons will support you every step of the way.
MATERIAL YOU NEED
– Yarn in pink, green, light green, white and red (I used double threads of a 4 ply yarn) – 4.50 mm crochet hook (or the size you need depending on your type of yarn) – Tapestry Needle – Long doll making needle – Polyester stuffing – 10 mm safety eyes – Black embroidery floss
Approximate size of a finished watermelon: 17×8 cm
WATERMELON
With pink yarn
Start with a magic ring
R1: 6 sc into the magic ring
R2: [1 inc] x6 (12)
R3: [1 sc, 1 inc] x6 (18)
R4: [2 sc, 1 inc] x6 (24)
R5: [3 sc, 1 inc] x6 (30)
R6: [4 sc, 1 inc] x6 (36)
R7: [5 sc, 1 inc] x6 (42)
R8: [6 sc, 1 inc] x6 (48)
R9: [7 sc, 1 inc] x6 (54)
R10: [8 sc, 1 inc] x6 (60)
R11: [9 sc, 1 inc] x6 (66)
R12: [10 sc, 1 inc] x6 (72)
Change to white
R13: [11 sc, 1 inc] x6 (78)
Change to light green
R14: [12 sc, 1 inc] x6 (84)
Change to green
R15: [13 sc, 1 inc] x6 (90)
Finish with 3 sl. Cut the yarn and weave in the ends.
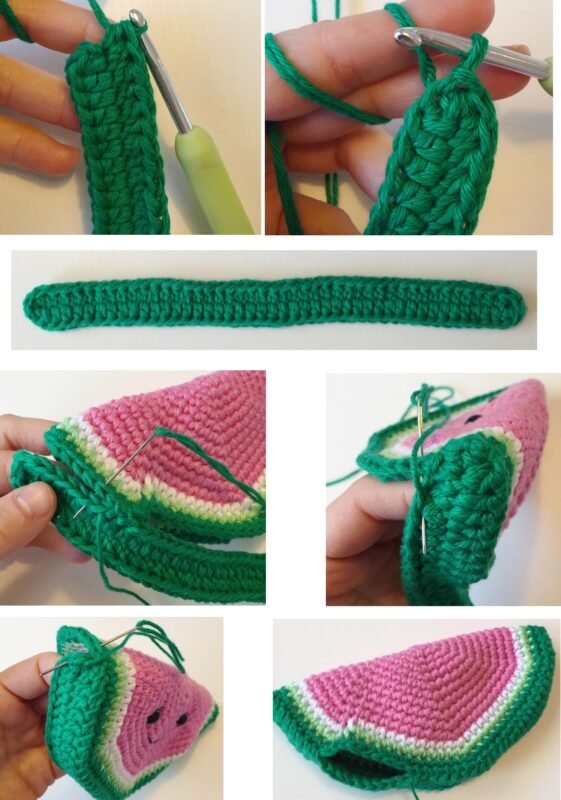
Fold the piece. (Picture on page 5)
Embroid a mouth in the middle between row 8 and 9. (I used 4 strands of DMC embroidery
floss)
How to Crochet a Mini Watermelon
Attach the safety eyes between row 7 and 8. (see pics)
If you want to do the watermelon with the blinking eye, just attach one safety eye and
embroid the blinking one. (Pictures on pages 5-6)
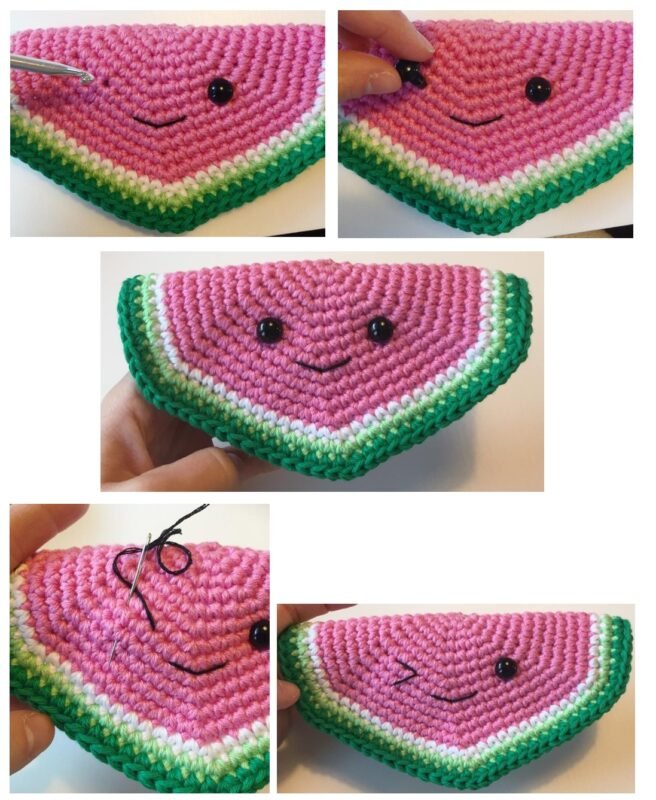
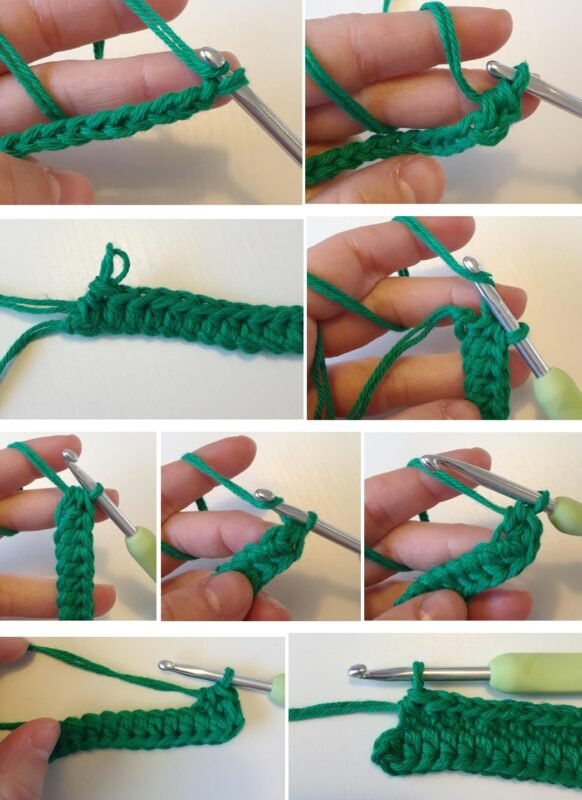
THE GREEN EDGE (Pictures on pages 7-8)
Chain 45
Hdc in the second ch from the hook. hdc in the following 42 stitches until you come to the
end of the row. 3 hdc in the same stitch at the end of the row.
Turn around the corner without turning the piece over. Hdc in the following stitches.
2 hdc in the last stitch. Finish with 1 sl in the first hdc.
Cut the yarn and weave in the ends.
Crochet watermelon keychain free pattern
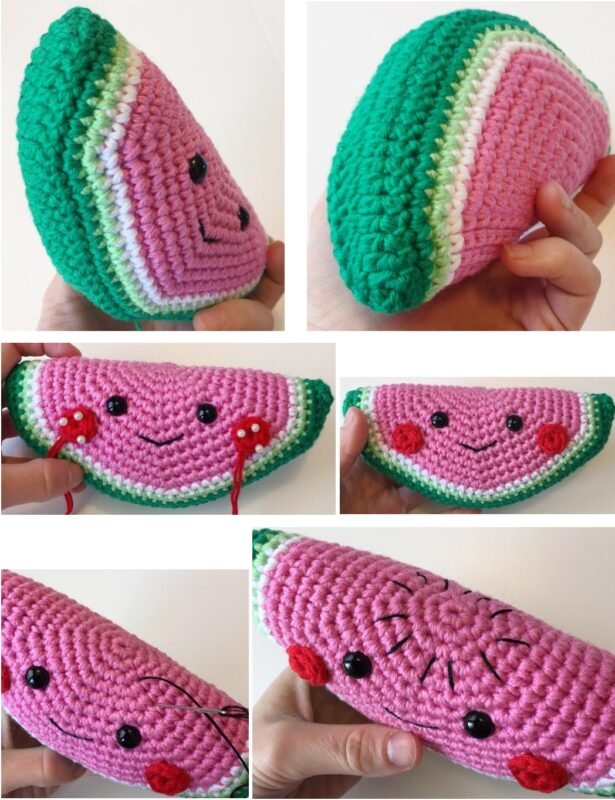
Take the green edge and place it along the bottom of your watermelon. Sew the edge on to
the bottom, I prefer to start on the upper side on the backside of the watermelon.
When you have about 5 cm left start stuffing. Don´t stuff it to hard and flatten it as you are
stuffing so it get a nice flat watermelon slice shape. (Pictures on pages 8-9)
CHEEKS (make two)
With red yarn
Make a magic ring
R1: 6 sc into the magic ring (6)
sl in the first sc, fasten off leaving a 10 cm long tail for sewing.
Pin the cheeks to the watermelon and sew them on.
FINISHING
Embroid the black seeds on top of the watermelon (Pictures on page 9)
And you’re done
Watermelon crochet pattern PDF free