crochet Pumpkin 2026
Spread the lovelooking for a cute and easy crochet pumpkin pattern? This beginner-friendly crochet pumpkin tutorial is perfect for fall, autumn décor, and Halloween projects . Using simple stitches and step-by-step instructions, this pattern helps you create a beautiful handmade pumpkin in no time. Whether you want to decorate your home, make a seasonal gift,…
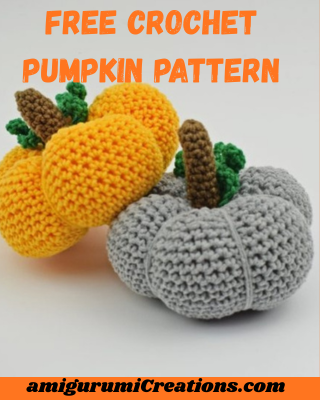
looking for a cute and easy crochet pumpkin pattern? This beginner-friendly crochet pumpkin tutorial is perfect for fall, autumn décor, and Halloween projects
. Using simple stitches and step-by-step instructions, this pattern helps you create a beautiful handmade pumpkin in no time. Whether you want to decorate your home, make a seasonal gift, or use up leftover yarn, this crochet pumpkin pattern is a fun and creative project suitable for all skill levels.
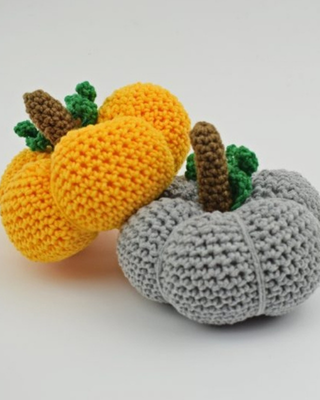
For this project
I used cotton/acrylic yarn 50/50. 3mm crochet hook size, tapestry needle
for sewing all the parts and polifiber for stuffing.
Big one : In this pattern we will work in continues spiral rounds.For big one use yellow
color and for small one grey color yarn. Repeat Rnd 1-9 for small one and then continue
working Rnd 12 to 24 and than continue with Rnd 27 to 35. End
Resources and tutorials you may find helpful in following this pattern: Crochet Abbreviations, Crochet Abbreviations: US to UK Conversionrochet Conversion Chart. Find links to stitches on the “Tutorial” menu: will show basic stitches used in many patterns and shows our growing collection of crochet stitch tutorials
double crochet half
double treble crochet
increiase in crochet
Change Colours in Amigurumi
crochet pumpkin pattern
Rnd 1 : Start with MR, and secure with sl.knot than make 6 sc into the circle(6)
Rnd 2: * inc * rep 6 times.(12)
Rnd 3: * 1 sc in next st, inc in next st * rep 6 times (18)
Rnd 4: * 1 sc in next 2 sts, inc in next st * rep 6 times (24)
Rnd 5: * 1 sc in next 3 sts, inc in next st * rep 6 times (30)
Rnd 6: * 1 sc in next 4 sts, inc in next st * rep 6 times (36)
Rnd 7: * 1 sc in next 5 sts, inc in next st * rep 6 times (42)
Rnd 8: * 1 sc in next 6 sts, inc in next st * rep 6 times (48)
Rnd 9: * 1 sc in next 7 sts, inc in next st * rep 6 times (54)
Rnd 10: * 1 sc in next 8 sts, inc in next st * rep 6 times (60)
Rnd 11: * 1 sc in next 9 sts, inc in next st * rep 6 times (66)
Rnd 12- 24: sc in each st all around(66)
9/10
crochet pumpkin pattern free
Rnd 25: * sc in next 9 sts, dec * rep 6 times(60)
Rnd 26: * sc in next 8 sts, dec * rep 6 times(54)
Rnd 27: * sc in next 7 sts, dec * rep 6 times(48)
Rnd 28: * sc in next 6 sts, dec * rep 6 times(42)
Rnd 29: * sc in next 5 sts, dec * rep 6 times(36)
Rnd 30: * sc in next 4 sts, dec * rep 6 times(30)
Rnd 31: * sc in next 3 sts, dec * rep 6 times(24)
Rnd 32: * sc in next 2 sts, dec * rep 6 times(18)
Rnd 33: * sc in next 1 sts, dec * rep 6 times(12). Fill with polifiber.
Rnd 34: * dec * rep 6 times(6)
Rnd 35: * dec * rep 3 times(3) End. Take the same yarn and tapestry needle, then insert the
pumpkin crochet pattern
needle to center which is under the pumpkin and pull through don’t tight it too much just to
form the pumpkin. Repeat this 5 or 6 times. End
Vines of pumpkin (green color yarn) :
*Ch 13, sc in second ch from hook, sc in each st across. * rep 4 times for the big one and 3
times for small one. End
Stem of pumpkin (brown color yarn) :
Start with MR, secure with sl.knot and make 7 sc into it.
Rnd 1- 8: sc in each st all around.End
Sew firstly the vines arond the center on the pumpkin, then the stem.
I would love to see some pics from your projects. You can share them with meon my