crochet cow pattern
Spread the loveWhen I started this crochet cow pattern, I was thinking of all the comforting, nurturing energy moms bring into our lives—so of course, I had to turn that into a soft, squishy crochet version. This easy cow pattern is perfect as a handmade gift for Mother’s Day, birthdays, or just a little “thank…
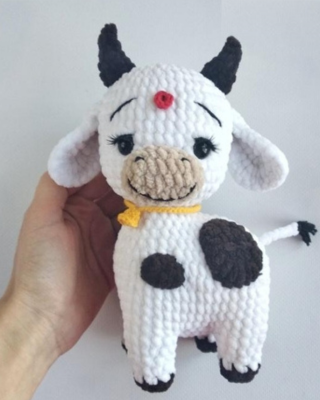
When I started this crochet cow pattern, I was thinking of all the comforting, nurturing energy moms bring into our lives—so of course, I had to turn that into a soft, squishy crochet version. This easy cow pattern is perfect as a handmade gift for Mother’s Day, birthdays, or just a little “thank you” hug in yarn form. crochet bat pattern_ crochet bat pattern

Materials
Yarn of basic color for the bull: beige Yarnart Dolce 747
(120m/100g)/Himalaya dolphin baby 365 (120m/100g). For the
cow: white Yarnart Dolce 741 (120m/100g)/Himalaya dolphin
baby 301 (120m/100g) – 1 skein
2) Yarn of additional color for horns, hooves, and spots: dark brown
Himalaya dolphin baby 343– 15-25 g. You can replace the color
with brown or black. For pink cow: pink Himalaya dolphin baby
309 (120m/100g) – 15-25 g.
3) A little yarn of additional color (5-10g) for the bull’s nose: milky
Yarnart Dolce 745 /Himalaya dolphin baby 308 . For the cow’s
nose: light beige Yarnart Dolce 771 . For the pink cow’s nose:
white or light peach Himalaya dolphin baby 333.
5) Black round plastic safety eyes of 12 mm in diameter
6) False eyelashes for the cow
7) Transparent super glue for the eyelashes
nose.
4) A little yellow yarn for a bell – (Alize Cotton gold, Yarnart jeans)
8) Black yarn to embroider the eyelashes line, the brows and the
9) Threads of corresponding colors to sew nose, ears, horns.
10) Synthetic fiberfill (I use ball hollowfiber).
11) Crochet hook of 3-4 mm. I used a hook of 3.5 mm;
12) Crochet hook of 2-3 mm for a bell.
13) 8 stitch markers
14) Pins for attaching the parts
- Ss– slip stitch
- Ch- chain
- Sc– single crochet
- Inc– increase, crochet 2 sc into the same stitch
- Inc×6- 6 increases one by one
- Dec– decrease, 2 sc with the same top
- Hdc– half double crochet
- Inc hdc– 2 hdc into the same stitch
- Dc– double crochet
- (1 sc, inc)×8– repeat the combination in brackets 8 times.
- Inc dc×5– 5 increases of double crochets
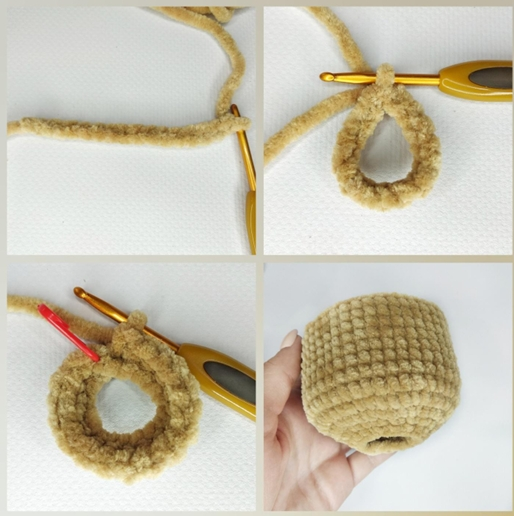
Simple crochet cow pattern free pdf
Crochet in a continuous spiral. 4 parts.
The marker in the pattern is put into the first loop of
the round.
1) Work with yarn of additional color: 2 ch, into the 2nd loop
from hook: 6 sc (6)
2) (2 sc, inc)×2 (8)
3) Change to basic color: ss, 8 sc– work the last sc,
inserting the hook one round below, into the stitch, where
the first ss was made. Don’t count the ss when counting the
stitches (8)
It is necessary to fix the ends of the threads after the
color change.
4) (3 sc, inc)×2 (10)
5) 1 sc, inc, 4 sc, inc, 3 sc
(12)
6) (5 sc, inc)×2 (14)
7) 14 sc, ss
Fasten off and cut the
thread
Belly
Crochet the bull’s belly with basic color.
Crochet the cow’s belly starting with the additional color.
Work in a spiral:
1) 2 ch, into the 2nd loop from hook: 8 sc
2) inc×8 (16)
3) (Change to basic color for the cow)
(1 sc, inc)×8 (24) Don’t cut the thread, you will need it for
attaching the legs.
Attaching the legs
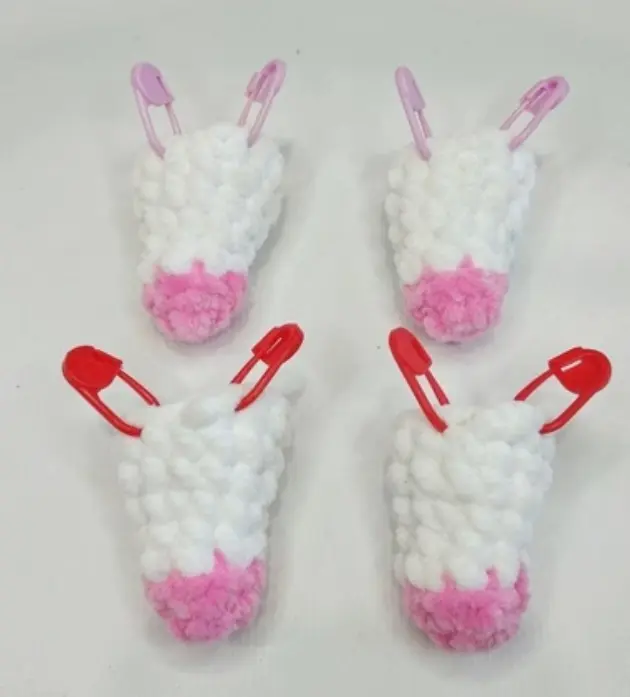
Mark 4 stitches on the
legs.
The end of the round must
be between the markers.
Scheme of attaching:
The beginning is marked with the arrow.
Black– numbers of the legs.
Red– stitches on the legs and belly, which must be
crocheted together.
Green– stitches of the belly, crocheted separately.
Attaching the legs
Mark 4 stitches on the
legs.
The end of the round must
be between the markers
Scheme of attaching:
The beginning is marked with the arrow.
Black– numbers of the legs.
Red– stitches on the legs and belly, which must be
crocheted together.
Green– stitches of the belly, crocheted separately.
Attaching the legs
Put the first leg to the body, face side to face side.
Leave the markers in the legs, you will need these
stitches in the next round
Crochet 4 sc for both parts (with the leg closer to you,
insert the hook into the stitch of the body, and then into
the stitch of the belly).
Then make 1 sc on the belly.
Put the 2nd leg to the body and crochet 4 sc on both parts.
3 sc on the belly.
Put the 3rd leg to the body and crochet 4 sc on both parts.
1 sc on the belly.
Put the 4th leg to the body and crochet 4 sc on both parts.
3 sc on the belly (24)
Start crocheting the body.
body
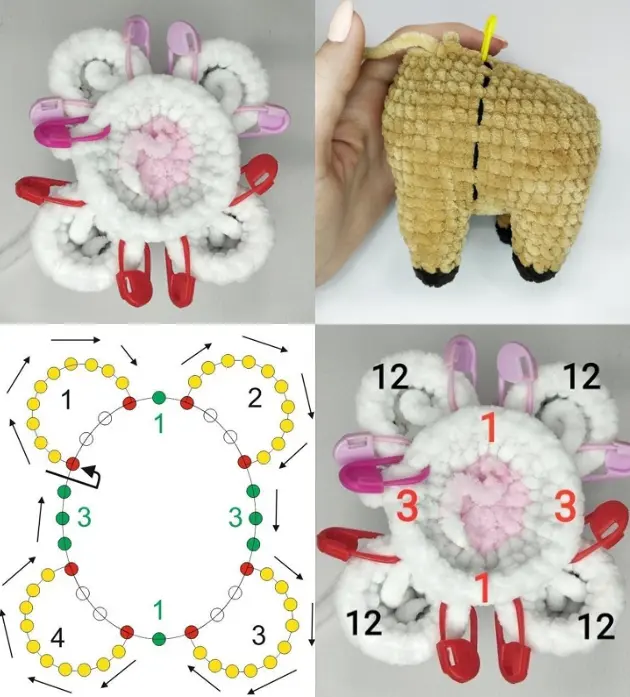
Work in a spiral. Stuff thebody in process. When stuffing, focus on the form
of the body from the photo. Mark the beginning of the round.
Watch the marker line. If the beginning of the round displaced, make a shifting sc.
To make a shifting sc, make one more sc and shift the
marker line correspondingly. Don’t count the shifting sc when counting the stitches.
The photo on the right shows how the marker line must go.
Body
The 1st round of the body:
On this stage the inner parts of the legs are already
attached to the body. Now you have to work on the outer
sides.
There are 10 stitched remained on every leg (14
stitches minus 4 attached stitches). You will work on these
stitches + on the edge stitches, attached to the body, they
are marked. So, 12 stitches on every leg will be used.
The crocheting direction is pointed with arrows.
The Red stitches on the scheme are the marked loops.
Green and Yellow are the stitches on the belly and on
the legs which must be crocheted.
Body
1) 12 sc on the 1st leg, 1 sc
on the belly,
12 sc on the 2nd leg, 3 sc on
the belly,
12 sc on the 3rd leg, 1 sc on
the belly,
12 sc on the 4th leg, 3 sc on
the belly (56)
2-8) 56 sc- 7 rounds without changes for the cow (when
working of cotton/semicotton yarn, make 8 rounds without
changes)
Bull– make 8 rounds without changes for the bull (when
working of cotton/semicotton yarn, make 9 rounds without
changes)
9) (7 sc, dec)×2, 13 sc, dec, 4 sc, dec, 3 sc, dec, 4 sc, dec, 6
sc (50)
10) 5 sc, dec, 9 sc, dec, 10 sc, dec, (3 sc, dec)×3, 5 sc (44)
11) 6 sc, dec, 5 sc, dec, 10 sc, dec, 2 sc, dec, 3 sc, dec, 2 sc,
dec, 4 sc (38)
12) 22 sc, dec×6, 4 sc (32)
13) 19 sc, dec×6, 1 sc (26)
Body
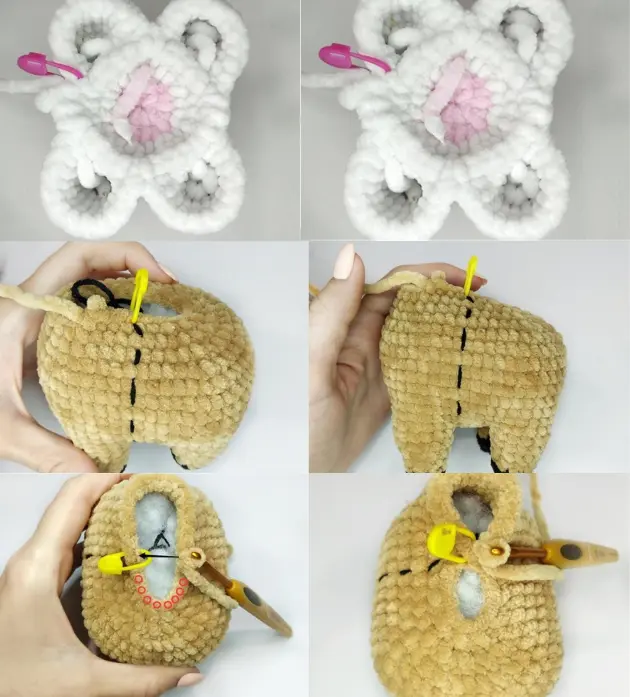
On this stage, stuff the legs and the lower part of the
body.
14) 16 sc, dec. Don’t finish crocheting the round. Skip 8 sc
and continue crocheting from the beginning of the round.
It will be convenient to sew the hole after you finish
crocheting the neck joint.
15) dec, 15 sc (16) Now start crocheting THE NECK JOINT
Neck joint
If you want to make a stable neck, continue
crocheting the head, starting from the 2nd round.
1)inc×16 (32)
2-3) 32 sc– 2 rounds of 32 sc
4) dec×16 (16)
5) dec×8 (8)
Cut the thread, leaving an end 30 cm long.
Now crochet the head, and then finish crocheting the
neck joint
Head
Work with yarn of basic color.
Crochet the chain and the first round of the head as
tight as you can. It is necessary for a snug fit to the neck.
(You may take a thinner hook, or add thin cotton thread of
matching color to the basic thread, and crochet the chain
and the 1st round with both threads).
After the 1st round check the ring, it mustn’t stretch
1) Make 16 ch (consider the initial loop of the knot the
1st loop of the chain. Don’t pull the knot too tight)
Join the chain in a ring with ss (16)
Continue crocheting in a continuous spiral: ch, 15 sc (16)
(consider the ch the first stitch of the round, and mark it).
Hide the end from the additional chain inside the stitches
of this round, or fix it on the inner side of the head.
2) inc×16 (32)
3) (3 sc, inc)×8 (40)
4) 10 sc, inc, 18 sc, inc, 10 sc (42)
5-12) 42 sc- 8 rounds without changes (when working
of cotton/semicotton yarn, make 9 rounds without changes,
then continue crocheting according to the scheme)
In the Attacment 1
there is a scheme of crocheting the
head with a spot.
Eyes
Use black plastic safety eyes with a diameter of 12 mm.
Glue false eyelashes on the cow’s eyes, stepping a little
from the edge to leave some space for making the eyelids.
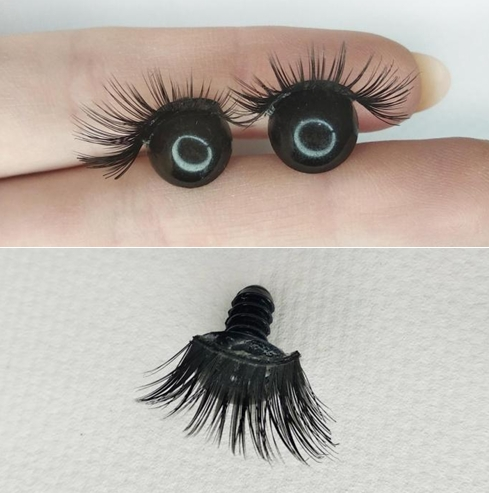
For more reliable eye attachment, you can make a base
of felt (or other dense thin material) under the plugs. So
that the eyes cannot be pulled out through the holes
between crochets.
Additionally, you can gently fuse the tip of the mount
and flatten it by pressing it to the plane surface.
An example of a felt base:
Eyes
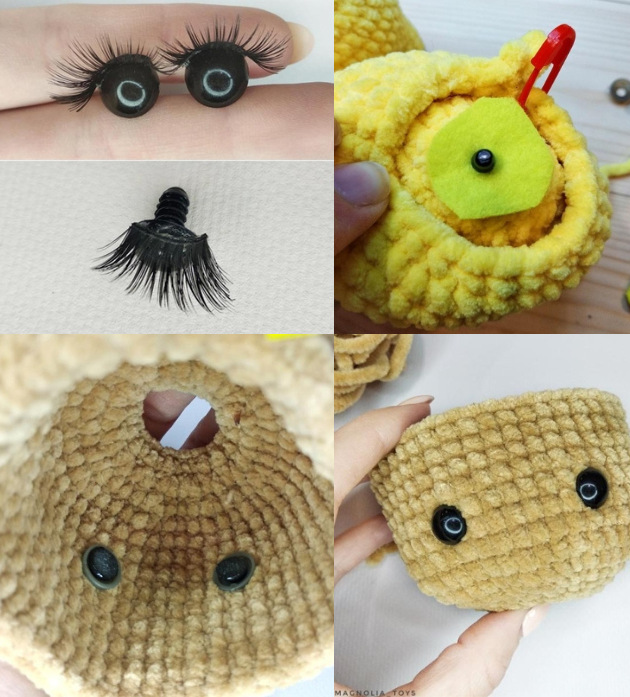
Fix the eyes between the rounds 7 and 8. The distance
between the fixing points is 8 sc.
Before you choose the places for the eyes, make sure
that the end of the round is on the back of the head.
Put the head with attached eyes aside for a while
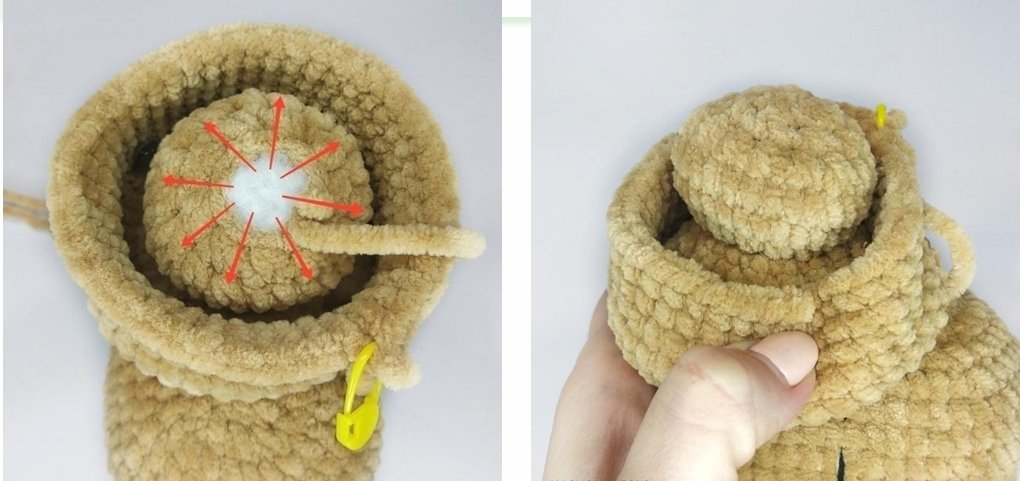
Finishing the neck joint
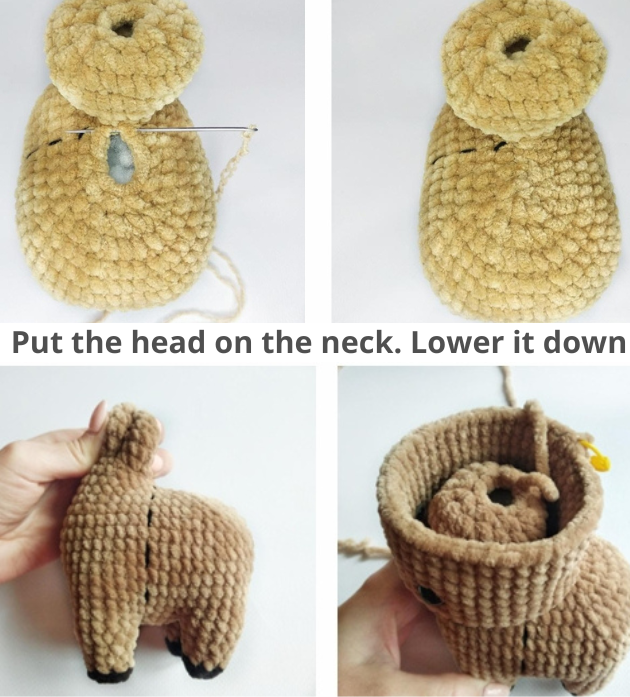
On this stage, stuff the upper part of the body and
carefully sew the hole with a thread of matching color. Don’t
stuff the joint yet
Put the head on the neck. Lower it down.
Finishing the neck joint
Stuff the neck firmly.
Stuff the joint as firm as you can. The shape of the
joint is a flattened ball. Try to stuff the joint more on the
sides then in the center.
It is very important for reliable fastening of the head.
Crochet the last round of the joint: 4 dec, ss.
Add more fiberfill (for reliability), fix and cut the
thread, tighten the hole and hide the end.
The joint must be stuffed very dense, so that it is
almost impossible to squeeze it with your fingers.
Make sure that the head can’t be removed from the
joint. Rotate it, twist it, pull it. The head must hold tight on
the joint and mustn’t be removed.
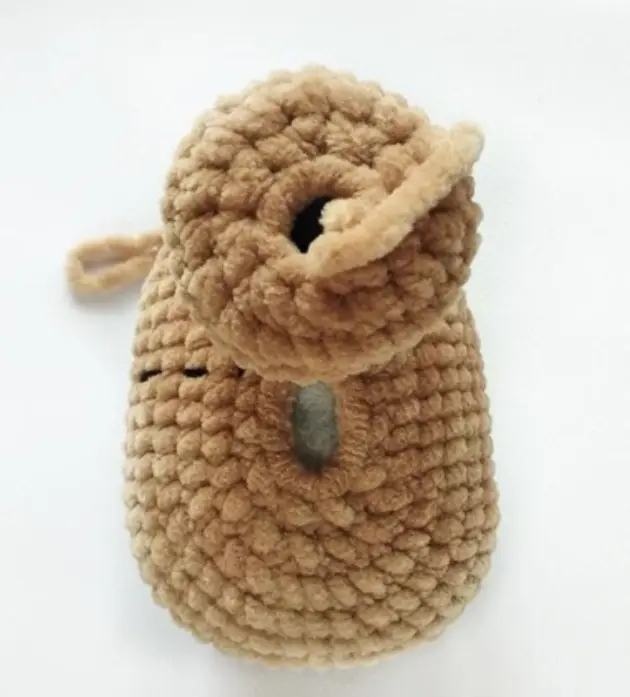
Finishing the head
Next, straighten the head (make sure that the head is
pressed against the joint from below).
Stuff the head neatly, it most be round.
When stuffing, pull the head up to press it’s lower part
to the joint.
Pay attention to the space between the joint and the
walls of the head on the sides, stuff this place well.
Finish crocheting the crown:
13) 10 sc, dec, 18 sc, dec, 10 sc
(40)
14) (3 sc, dec)×8 (32)
15) (2 sc, dec)×8 (24)
16) (1 sc, dec)×8 (16)
17) dec×8 (8)
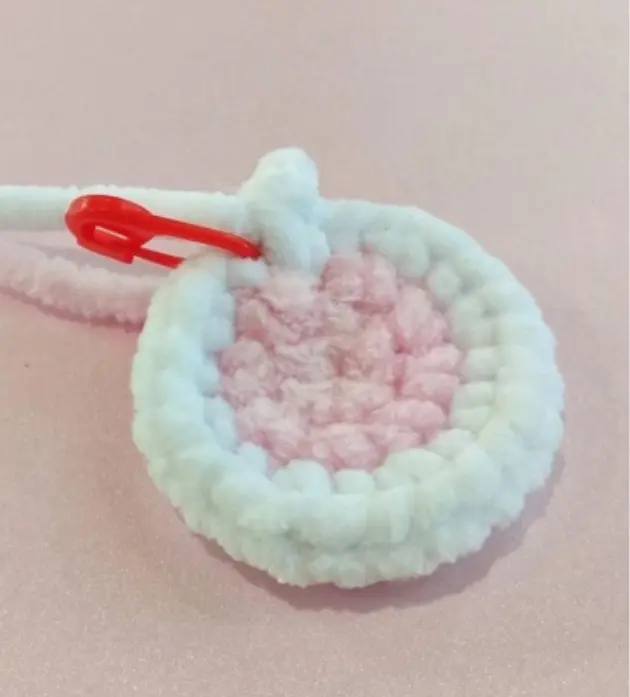
Finish stuffing the head. The head must have a shape of a ball. Cut the thread and tighten the hole carefully, hide the end inside the head. If the remained hole is too big to tighten, make a few more decreases before tightening.
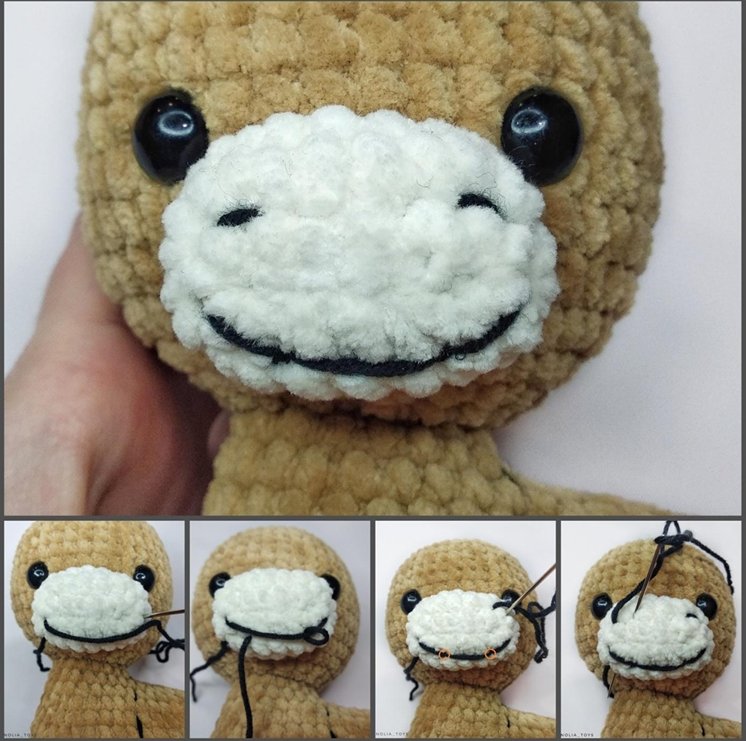
Nose
Work with the additional yarn. Crochet in a spiral.
1) Make a chain of 6 loops and crochet round the chain: 4 sc
into the 2nd loop from hook, then 3 sc on the chain, 4 sc into
the last loop, 3 sc on the opposite side of the chain (14)
2) inc×4, 3 sc, inc×4, 3 sc (22)
3) 4 sc, dec×2, 3 sc, dec×2, 7 sc (18)
4) 18 sc (18)
5) dec×3, 1 sc, dec×4, 1 sc, dec (10) slightly stuff the part.
Pay attention, that the nose has an oval shape, but the front
and the back sides are flat.
6) dec×5, Fasten off and cut the thread.
Pin the nose to the head.
If you want to make less volumetric nose, skip the 4th round
of the scheme.
Sew the nose to the head, starting from the upper line.
When sewing, insert the needle . Alternately insert the
needle under the stitches of the nose and head.
The safest way is to sew the nose in 2 rounds.
Mouth and nostrils
Embroider with black thread. Pull the thread out at
one side, make one long stitch, and fix the thread with two
short stitches in the places marked with orange. Then
embroider two nostrils. Drag the needle to the initial point,
fix the ends and hide them inside the nose.
Eyelashes line
For the bull:
Embroider the eyelashes with black thread Insert the
hook into the center between the eyes. Embroider the
eyelashes line, and drag the thread to the initial point. Cut
the thread and hide the ends.
BE CAREFUL, don’t pick the neck joint inside the head
Eyelashes line
For the cow:
Embroider the same eyelashes line with black thread.
Then, into the same points, make one stitch with basic yarn,
forming the eyelashes.
Eyebrows
Make marking for the eyebrows.
The distance between the upper points of the eyebrows
is 6 sc. The distance from the eye to eyebrow is 3 rounds to
the upper part and 1-2 rounds to the lower part. The length
of each eyebrow is 4 sc.
Embroider the eyebrows with black thread. Insert the
needle into the center of the forehead. Embroider the
eyebrows and drag the thread to the initial point. Cut the
thread and hide the ends.
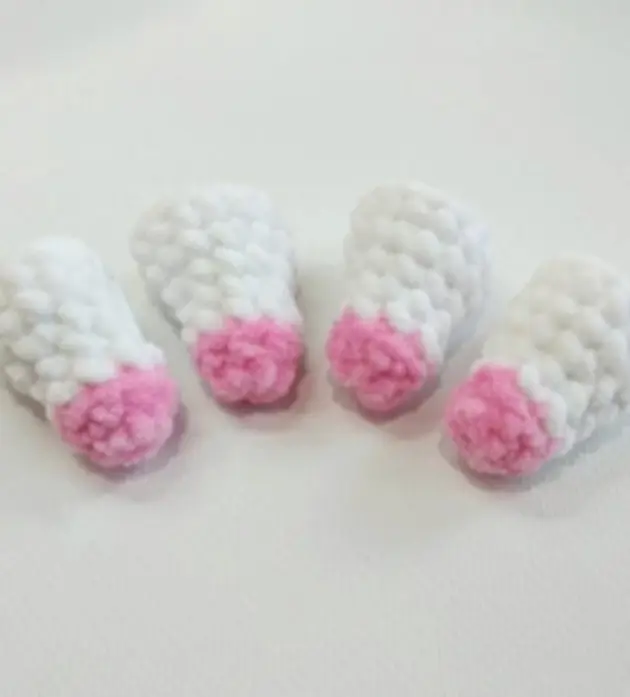
Horns
2 parts.
Yarn of additional color. Work in a spiral. Slightly stuff the
wide parts of the horns with fiberfill.
Bull’s horns:
1) 2 ch, into the 2nd loop from hook: 8 hdc (8)
2) 8 sc for the back loop (only in this round) (8)
3) 3 sc, dec, 3 sc (7)
4) 7 sc (7)
5) 2 sc, dec, 3 sc (6)
6) 2 sc, dec, 2 sc (5)
7) Take thinner hook (2,5-3 mm) and crochet carefully: 1 sc,
dec×2 (3) It may be hard to work, but, due to the thinner
hook, you will get horns with pointy ends.
8) dec, ss, fix and cut the thread, hide the end.
Cow’s horns:
1) 2 ch, into the 2nd loop from hook: 8 hdc (8)
2) 8 sc for the back loop (only in this round) (8)
3) 3 sc, dec, 3 sc (7)
4) 2 sc, dec, 3 sc (6)
5) Take thinner hook (2,5-3 mm) and crochet carefully: 1 sc,
dec×2, 1 sc (4) It may be hard to work, but, due to the
thinner hook, you will get horns with pointy ends.
6) dec×2, fix and cut the thread, hide the end.
Pin the horns to the head, check the symmetry, and sew the
horns.
Yarn of basic color. Work in a spiral.
1) Make a chain of 6 loops, crochet round the chain: 4sc into the 2nd loop from
hook, then on the chain: 2sc, 1 hdc, 5 hdc into the last loop, on another side of
the chain: 1 hdc, 2 sc (15)
2) inc×4, 1 sc, 1 hdc, 1 dc, inc of dc×5, 1 dc, 1 hdc, 1 sc, ss
Fasten off and cut the thread. Fold each ear in half with
the wrong side inside and sew the tip. Leave the end of the thread for sewing.
Sew each ear on the 10-11 rounds of the head, on the distance 6 sc from the eye.
Spots
Work with yarn of additional color.
Small:
1) 2 ch, into the 2nd loop from hook: 8 sc, end with 1 ss,
Fasten off and cut the thread.
Big:
1) Make 3 ch, crochet the chain round: into the 2nd loop from
hook: 5 hdc, then 5 hdc into the last loop (10)
2) Inc of hdc×10, 1 sc, ss, Fasten off and cut the thread.
Make as many spots as you wish and sew them to the body as
you like. You can see an example of my cow with spots in the
photo below:
Tail
Cut 6 pieces of additional yarn 7-8 cm long.Cutapiece
of basicyarn30-35cm long.
With basic yarn tie a knot in the middle of abunch of
short threads andtie10-12more knots. With acut of dark yarn form aneat tail-brush: tie2 knots at the base and drag the upper thread down sothatit does not stic kout. Cut the end of the tail evenly and fluff it with athick
needle or a comb. Attach the tail to the body at the 8thround.
Fix the tail using the remained ends of the yellow yarn
or sewit with another thread and hidet he ends inside the
body
Fringe
For the fringe cut a few pieces of yarn 8-9 cm long.
Tie the bunch of short pieces very tightly with a longer
piece. Try it on the head and fasten it with tails. Cut the
extra
Bell
Work with yellow yarn.
1) Make a chain of 40-45 loops (try it on the neck), into
the 2nd loop from hook make 5 sc. Consider these 5 sc the 1st
end of the bell. Continue working only on these stitches.
2) 5 sc (5)
3) inc×5, ss. Cut the thread, and drag the end to the
top of the bell. Put the chain on the neck and tie the ends,
then hide the ends inside the bell.