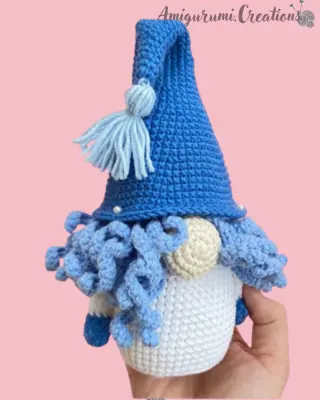
Aquarius Zodiac Gnome Crochet Pattern

Materials needed:
- Yarn Art Jeans, 55% cotton, 45% acryl, 50g/160m, next
colors:
- for body – white № 01
- For hair – blue № 15
- for hat – dark blue № 16
- for nose – nude № 05
- for décor – beige № 87, light blue № 75
Piece of cardboard 3 on 3 inch for one gnome’s base.
If you follow this advice your gnomes will be 18 cm/7 inch.
Abbreviations:
ch – chain stitch
sc – single crochet
hdc – half double crochet
dc – double crochet
trc – treble crochet
sl st – slip stitch
inc – increase, 2 sc in the next stitch
dc inc – 2 dc in the next stitch
dec – decrease, single crochet 2 stitches together
(16) – number of stitches in a round
(inc, sc)*N – repeat N times
BLO – back loop only
FLO – front loop only
3dcCL – a cluster of 3 double stitches.
A cluster of stitches, made into the same stitch or chain
space that are joined together at the top.
rev sc – reverse single crochet
Crochet hook 2 mm or 2.25 mm (US: B, UK:14)
Fiberfill, thick sewing needle, pins.
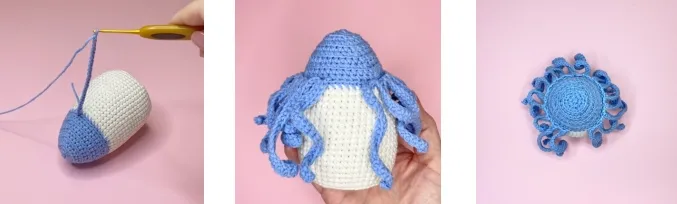
1.Body
With white yarn.
Start with making a round base. Work
in continuous rounds without slip
stitches.
Rnd 1: 7 sc in the MR
Rnd 2: 7 inc (14)
Rnd 3: (inc, 1 sc)7 (21) Rnd 4: (inc, 2 sc)7 (28)
Rnd 5: (inc, 3 sc)7 (35) Rnd 6: (inc, 4 sc)7 (42)
Rnd 7: (inc, 5 sc)7 (49) Cut off the base of cardboard. Rnd 8: BLO 49 sc Rnd 9-19: sc in each stitch around 11 rounds. Insert the cardboard base. Rnd 20: dec, 47 sc (48) Rnd 21: (dec, 14 sc)3 (45)
Rnd 22: 45 sc
Rnd 23: (dec, 13 sc)3 (42) Rnd 24: 42 sc Connect blue yarn. Rnd 25: (dec, 12 sc)3 (39)
Rnd 26: BLO 39 sc
Rnd 27: (dec, 11 sc)3 (36) Rnd 28: BLO (dec, 10 sc)3 (33)
Rnd 29: (dec, 9 sc)3 (30) Stuff the detail evenly and firmly with the fiberfill. Rnd 30: BLO (dec, 8 sc)3 (27)
Rnd 31: (dec, 7 sc)3 (24) Rnd 32: BLO (dec, 6 sc)3 (21)
Rnd 33: (dec, 5 sc)3 (18) Rnd 34: BLO (dec, 1 sc)6 (12)
Add some more fiberfill.
Rnd 35: 6 dec (6)
Cut off the yarn, leave a long end.
Close the top using a needle, hide the end into the body.
Curls.
Work in turning rows.
For free loops of 26-th round: Chain 25, start with the 2d
loop from the hook, 24 sc, leave 1 stitch below, 1 sl st.
Repeat 17 times and leave distance 5 free stitches for sewing
the nose.
For free loops of 28-th round: Chain 21, start with the 2d
loop from the hook, 20 sc, leave 1 stitch below, 1 sl st.
Repeat to the end of round.
For free loops of 30-th round: Chain 17, start with the 2d
loop from the hook, 16 sc, leave 1 stitch below, 1 sl st.
Cut off the yarn. Repeat to the end of round
If you want, you can leave the gnome without a hat, with
a curly hairstyle) for this, crochet two more rows of
curls:
For free loops of 32-th round: Chain 13, start with the 2d
loop from the hook, 12 sc, leave 1 stitch below, 1 sl st.
Repeat to the end of round.
For free loops of 34-th round: Chain 9, start with the 2d
loop from the hook, 8 sc, leave 1 stitch below, 1 sl st.
Repeat to the end of round
2.Hat
With dark blue yarn.
Rnd 1: 6 sc in the MR
Rnd 2: 6 sc (6)
Rnd 3: (inc, 1 sc)3 (9) Rnd 4-6: sc in each stitch around 3 rounds Rnd 7: (inc, 2 sc)3 (12)
Rnd 8-10: sc in each stitch around 3 rounds
Rnd 11: (inc, 3 sc)3 (15) Rnd 12-14: sc in each stitch around 3 rounds Rnd 15: (inc, 4 sc)3 (18)
Rnd 16-18: sc in each stitch around 3 rounds
Rnd 19: (inc, 5 sc)3 (21) Rnd 20-21: sc in each stitch around 2 rounds Rnd 22: (inc, 6 sc)3 (24)
Rnd 23: 24 sc
Rnd 24: (inc, 7 sc)3 (27) Rnd 25: 4sc,(inc, 8sc)2, inc, 4sc (30)
Rnd 26: 30 sc
Rnd 27: (inc, 9 sc)3 (33) Rnd 28: 5sc,(inc, 10sc)2, inc, 5sc(36)
Rnd 29: 36 sc
Rnd 30: (inc, 11 sc)3 (39) Rnd 31: 6sc,(inc, 12sc)2, inc, 6sc(42)
Rnd 32: 42 sc
Rnd 33: (inc, 13 sc)3 (45) Rnd 34: 7sc,(inc, 14sc)2,inc, 7sc(48)
Rnd 35: 48 sc
Rnd 36: (inc, 15 sc)3 (51) Rnd 37: 8sc,(inc, 16sc)2, inc, 8sc(54)
Rnd 38: 54 sc
Rnd 39: (inc, 17 sc)3 (57) Rnd 40: 57 sc Rnd 41: 9sc,(inc, 18sc)2, inc, 9sc(60)
Rnd 42: 60 sc
Rnd 43: (inc, 19 sc)3 (63) Rnd 44: 63 sc Rnd 45: 10 sc,(inc, 20 sc)2, inc, 10 sc (66)
Rnd 46: 66 sc
Rnd 47: 66 rev sc
Cut off the yarn. Hide the end
To make small decorative tassel. Cut a piece of light blue
yarn.
Wrap the yarn around your arms as shown on the photo.
Fasten.
Pull thread and make a knot to hold the tassel together.
Wrap some yarn several times around at the top of the
tassel approx. 1 cm from the top, this way you get a nice
little head at the top.
Cut the yarn loops at the end. Sew to the top of hat

Spots.
With light blue and white yarn. Make 3
spots.
Rnd 1: 7 sc in the MR, 1 sl st
Cut off the yarn. Hide the end. Sew to
the hat.
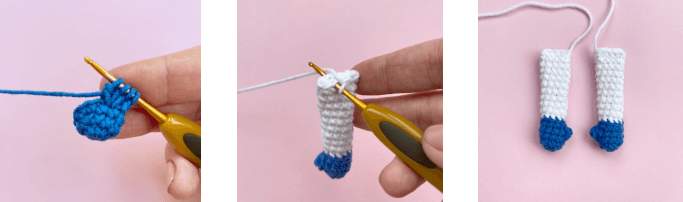
3.Arms
Start with dark blue yarn.
Rnd 1: 8 sc in the MR
Rnd 2: (inc, 3 sc)*2 (10)
Rnd 3: 10 sc
Rnd 4: 4 sc, 3dcCL, 5 sc (10)
(3dcCL – a cluster of 3 dc)
Rnd 5: 10 sc
Connect the white yarn:
Rnd 6: BLO 10 sc
Rnd 7-14: sc in each stitch around 9 rounds.
Stuff the bottom part of the arm (hand) with fiberfill.
Fold so that the stitches of the last round line each
other.
Crochet opposite stitches with 4-5 sc.
Cut off the yarn, leave a long tail.
4.Nose
With nude yarn.
Rnd 1: 7 sc in the MR
Rnd 2: 7 inc (14)
Rnd 3: (inc, 1 sc)7 (21) Rnd 4: (inc, 2 sc)7 (28)
Rnd 5: 28 sc
Rnd 6: (dec, 2 sc)7 (21) Rnd 7: (dec, 1 sc)7 (14)
Rnd 8: 7 dec (7)
Add some fiberfill.
Close the top using a needle
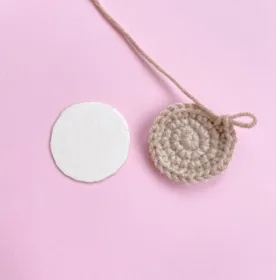
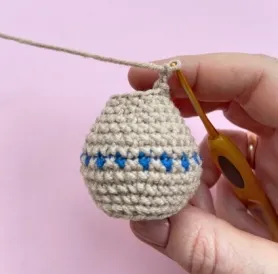
5.Jug
With beige yarn.
Start with making a round base. Work
in continuous rounds without slip
stitches.
Rnd 1: 7 sc in the MR
Rnd 2: 7 inc (14)
Rnd 3: (inc, 1 sc)7 (21) Rnd 4: (inc, 2 sc)7 (28)
Cut off the base of cardboard.
Rnd 5: BLO 28 sc
Rnd 6: (inc, 6 sc)4 (32) Rnd 7: (inc, 7 sc)4 (36)
Rnd 8: sc in each stitch around.
Connect the dark blue yarn, don’t cut
off the beige one.
Rnd 9: 1 sc with beige yarn, 1 sc with
dark blue yarn. Repeat to
the end of round. (36)
Cut off the dark blue yarn.
Rnd 10: sc in each stitch around.
Rnd 11: (dec, 7 sc)4 (32) Rnd 12: 3 sc,(dec, 6 sc)3, dec, 3sc
(28)
Insert the cardboard base.
Rnd 13: (dec, 5 sc)4 (24) Rnd 14: 2 sc,(dec, 4 sc)3, dec, 2 sc (20)
Rnd 15: (dec, 3 sc)*4 (16)
Rnd 16: (1 dc, 1 dc inc in next stitch) repeat to the
end of round. (24)
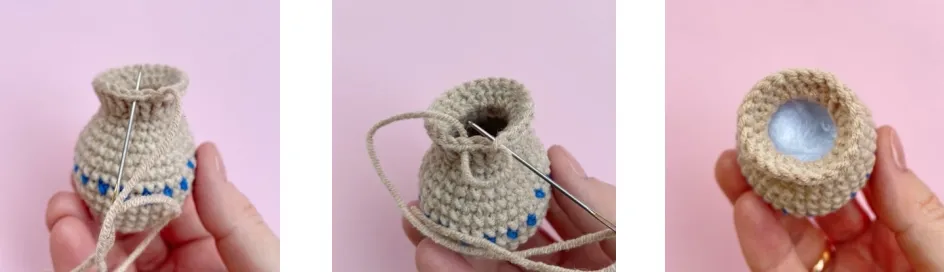
Cut off the yarn
Finish in an invisible way: thread the end of yarn through
the needle, skip one stitch and guide the yarn into the next
stitch as shown on the photo.
Insert the needle back in the same stitch where the yarn end
is coming from. Pull the yarn and fasten the obtained stitch
on the wrong side of detail.
Add some fiberfill into the jug.
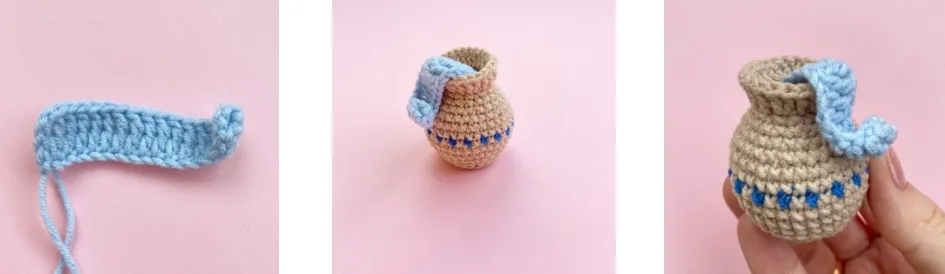
Water.
With light blue yarn.
Ch 17, start with the 3d loop from the hook, 15 dc, ch 2, 1
sl st in the first stitch of foundation.
Cut off the yarn, sew to the jug as shown on the photo
6.Assembly and decoration
Attach the arms, and nose to the body with some pins
between 25 and 26 rounds of the body

Put on the hat and
attach it with
hidden stitches.
Congratulations!
Your Gnome is
ready)
Don’t forget to
share your final
result on Instagram,