How to Crochet Around a Chain for Amigurumi
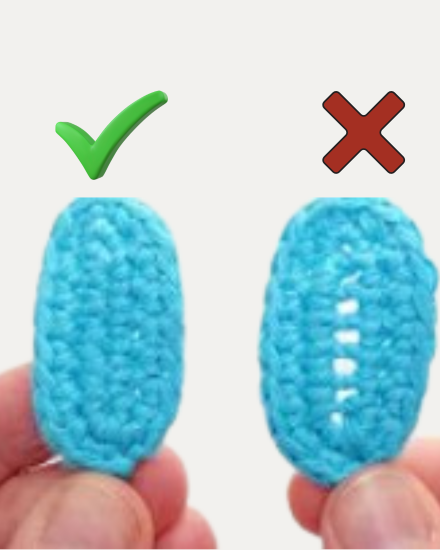
I’m going to show you how to crochet around a chain for Amy gry I use this in my patterns a lot when I want to make a piece that’s a little bit flat so you can see that this was built on a chain and then also the bottom part this is one long chain and I crocheted around it in rounds so I’m going to show you how to do that to do this
- CROCHET TERMS
- ch – chain
- inc – increase
- rnd – round
- sc – single crochet
- st(s) – stitch(es)
- [ ] – repeat steps between brackets for the specified number of times
- ( ) – the number of stitches you should have at the end of each round
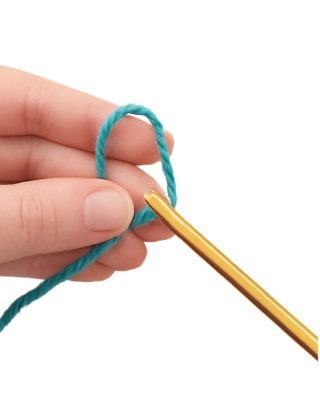
- you’ll need yarn and a hook and a stitch marker today I’m using the paint Box Cotton Aaron with a d 3.25 so to start you’re going to make a
Don’t forget to browse my Amigurumi tutorials for more tips, techniques, and inspiration
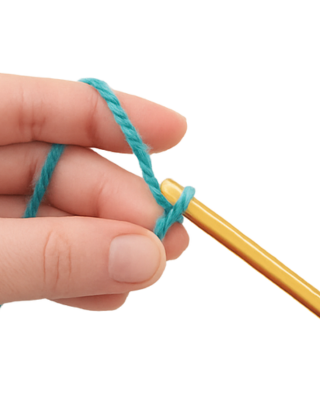
slip knot on your hook
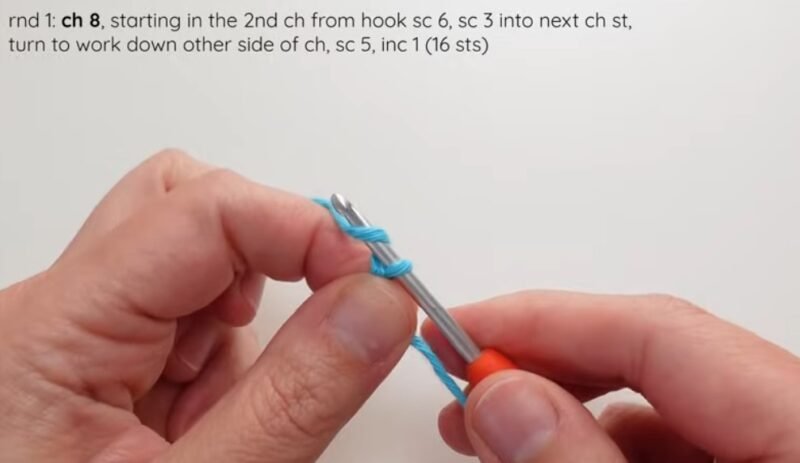
- so you take the tail make an X with your fingers around your fingers and then go under the first Loop over the second and pull up a loop and then pull both Tails tight and now I’m going to pull the working yarn which is the one connected to my yarn ball until the knot gets tight on my hook so I’m going to chain eight yarning uh over and bringing through so that’s one 2 3 4 [Music] oops 4 5 6 7 and eight so you can see one 2 3 4 5 6 7 eight little V stitches so then I’m going to turn
- it just like you normally would horizontally like if you were going back and forth in in rows in my patterns I always tell you to start in the second chain from the hook so this would be the first chain this would be the second chain from the hook there’s two ways to crochet into a chain you can either go into the chain from the top like this or a way that I prefer is to go in the back bump so if you turn your chain around you can see on the back that there’s bumps running all um along I like to crochet into the back
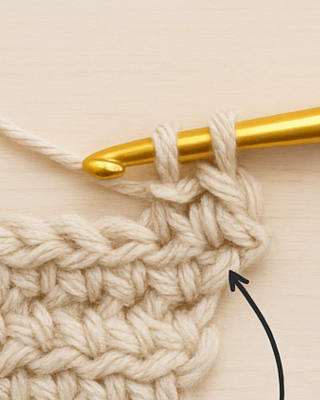
how you what crocheting into the chain looks like at the end
- bump so I will show you what crocheting into the chain looks like at the end and what the back bump just to show you what the difference is but I’m going to show you how to crochet into the back bump so same thing I’m starting in the second chain from the hook so here you could see the first bump and here is the second one so I’m going to do one single crochet into the back bump and it’s kind of a little trickier to start off because you have to make sure that your hook is only getting the back bump
- Stitch and goes through all the little strands yarn over pull through yarn over pull through so I’m going to do another single crochet into this next back bump so now I have two single crochets and I’ve worked in two chains I’m going to do four more single crochets one in each of the next and then when I get to the last one I’m going to do three single crochets into that last one okay I have now six single crochets and I’m on the last Stitch the last last chain I’m going to
- put three single crochets all into this last back bump this will allow me to turn to work down the other side so one 2 and three it it just naturally turns your work to work down the other side of the chain so because I did the stitches in the back bump I’m working into the top of the chain they look exactly like normal stitches which I like so I’m going to work one single crochet in the next 1 2 3 four five stitches and you’ll notice that I’m not working in this very last chain because
- BEST Way to Crochet Around a Chain for Amigurumi! vedio tutoril
- it’s the same chain I did these three in I also like to crochet over the tail so I don’t have to weave it in so I’m going to insert my hook into this Stitch and do a single crochet and you can see how it just wraps right around and then in the next [Music] one and then just keep going until I get to the last [Music] one one more it’s a little tight which is why it’s kind of difficult for me to do it I’ve reached the last stitch on the other side and I’m going to do two
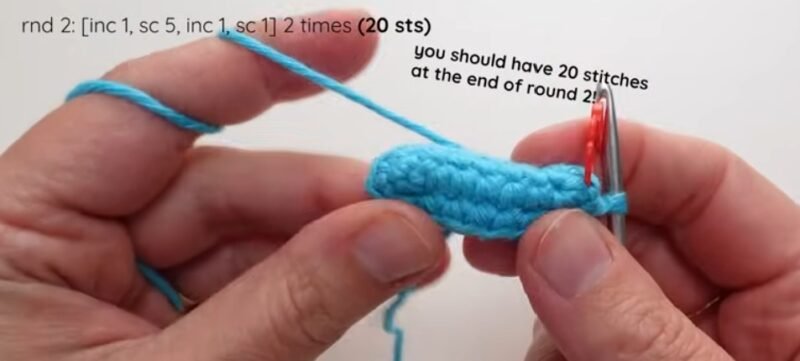
- single crochets into this last one and now I’m at the around again I’m at the first Stitch we made on the chains on the other side so now I’m going to make two single crochets into the next Stitch and they’re just normal stitches now so it might be easier to just kind of see and get your hook into it I’m going to do a stitch marker in that first one just to know where the beginning of my round is and I’m going to do 1 2 3 [Music] 4 5 five single crochets and now I’m going to do two
Did you enjoy this tutorial?
• Leave a Comment: Share your thoughts and feedback in the comments section below — I’d love to hear from you!
• Save for Later: Pin this tutorial on Pinterest so you can easily find it again whenever you need it.
• Share the Love: If you found this helpful, feel free to share it on social media with fellow crochet lovers.
• Subscribe: Join my newsletter to receive updates, new free patterns, and step-by-step video tutorials delivered straight to your inbox.
• Join the Mystery Crochet Along: Be part of a fun and creative crochet experience! Sign up for free and crochet a surprise amigurumi project together with our community.