Stunning Crochet Granny Square
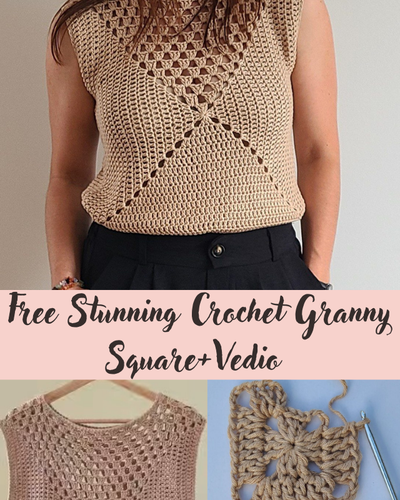
The Sambria Granny Square Top is a versatile, eye-catching piece that can be styled in multiple ways for different occasions. For instance, for a casual daytime look, pair it with high-waisted denim shorts or jeans and simple sandals, letting the crochet texture take center stage. Additionally, layer it over a fitted camisole or bralette for added comfort and contrast, or wear it under a light jacket during transitional weather. On the other hand
Notes:
– This pattern is written in US terms
– Magic Ring or Ch 5 and join.
– Ch 3 at beginning of row counts as first dc.
– The basic square should not go beyond your shoulder line.
– The top is designed to be on the body, not lose. It’s important that the top part of the top, the angle that is more open (the granny squares part with the holes) do not go lower than your bra.
he pattern is coming with a video tutorial available
Hook: 3.5 mm/ E crochet hook
– Notions: yarn needle, scissors, stitch markers
– [ ] These instructions go in same stitch
- – Ch: chain
- – Dc: double crochet
- – Eor: end of row
- – Rep: repeat
- – Mr: magic ring
- – Sk: Skip
- – St: stitch(es)
- – Sp: Space
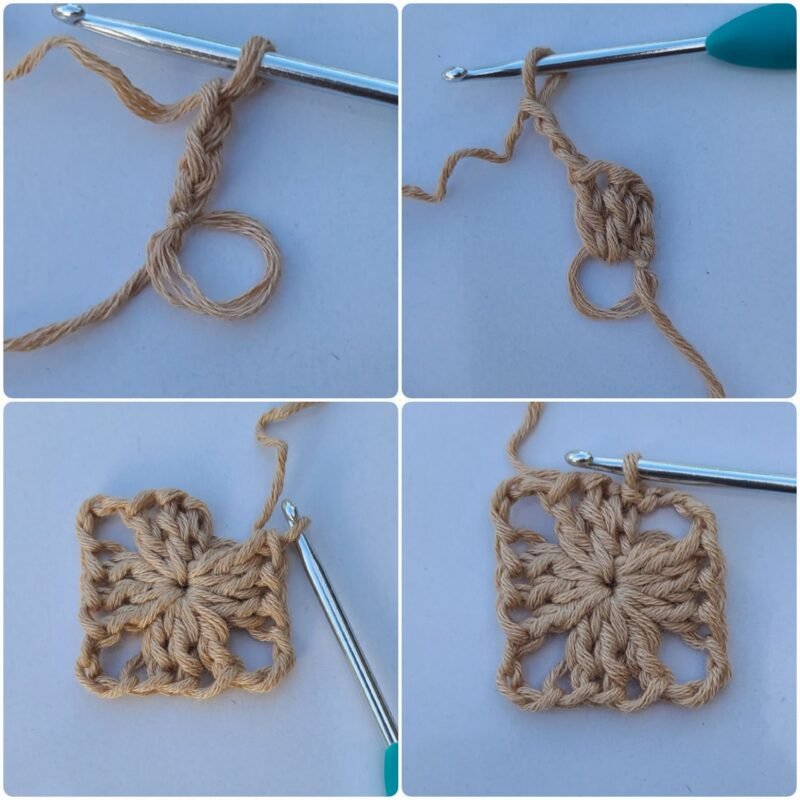
Basic granny square
Make 2
MR (or ch 5, sl st to make a ring)
Row 1: Ch 3, 2 dc, ch 3, 3 dc, ch 3, 3 times, sl st to top of ch 3 to join
Row 2: Sl st 3x (to corner), ch 3 (counts as 1st dc), in corner space: [2dc, ch 3, 2dc], dc 3 into next stitches, in corner sp: [2dc, ch 3, 2dc], 3dc, in corner sp, [2dc, ch 3, 2dc], 3dc, in corner sp: [2dc,ch 3, 3dc], ch 1, sl st to join.
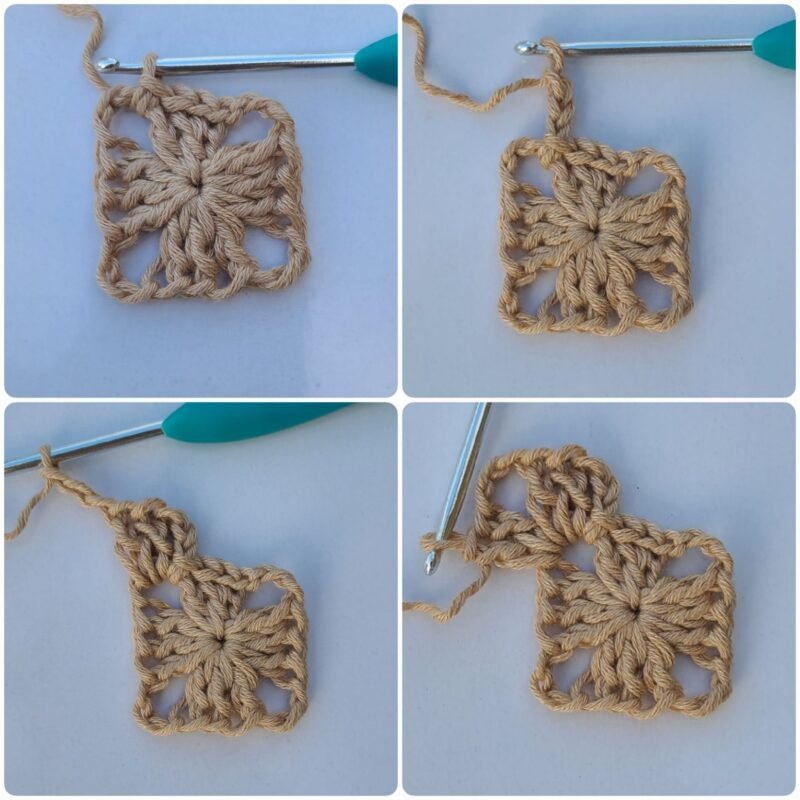
Row 3: Sl st 3x (to corner), ch 3 (counts as 1st dc), in corner space: [2dc, ch 3, 2dc], dc 7 into next stitches, in corner sp: [2dc, ch 3, 2dc], dc 7, in corner sp, [2dc, ch 3, 2dc], dc 7, in corner sp: [2dc, ch 3, 3dc], 3dc in ch 1 sp, ch 1, sl st to join
To work additional rounds, sl st to next space. In corners work [3dc, ch 3, 2dc] or [2dc, ch3, 3dc]. In spaces on sides work 3dc. Work a ch1 in between the dc clusters on the sides.
From row 4 to row 15 for Size S
From row 4 to Row 16 for Size M
From row 4 to row 17 for size L
From row 4 to Row 18 for size XL
From row 4 to Row 19 for size XXL
From row 4 to Row 20 for size 3XL
Sambria Granny Square Top: Back Panel
The size shown is Medium
Row 17: The last Row for each size.
Attach yarn on the right top side corner, into the ch3 space. Ch3 (counts as 1st dc), dc 2, ch1, 3dc into the next ch1 space from previous row. * ch1, 3dc into ch1 space. Rep from * to the left side corner, finishing with 3dc into the last corner. Cut the yarn. Fasten off.
Continue the Row 17 by skipping 24 dc on the left side for arm hole. Counts from the 2dc from the corner. Attach the yarn into the 25th dc from previous row. Chain dc in each stitch. Into the next 2 corners (2dc, ch 3, 2dc).
On the right side ch dc by the 25th dc counts from up to down, leaving the 24dc for arm hole.
For size
S leave 22 dc for arm hole
L leave 24 dc for arm hole
XL leave 26 dc for arm hole
XXL leave 28 dc for arm hole
3XL leave 30 dc for arm hole
Front Panel
The size shown is Medium
Row 17: The last Row for each size.
Attach yarn on the right top side corner, into the ch3 space. Ch3 (counts as 1st dc), dc 2, ch1, 3dc into the next ch1 space from previous row. * ch1, 3dc into ch1 space. Rep from * to the left side corner, finishing with 3dc into the last corner. Cut the yarn. Fasten off.
Continue the Row 17 by skipping 24 dc on the left side for arm hole. Counts from the 2dc from the corner. Attach the yarn into the 25th dc from previous row. Chain dc in each stitch. Into the next 2 corners (2dc, ch 3, 2dc).
On the right side ch dc by the 25th dc counts from up to down, leaving the 24dc for arm hole.
For size
S leave 22 dc for arm hole.
L leave 24 dc for arm hole
XL leave 26 dc for arm hole
XXL leave 28 dc for arm hole
3XL leave 30 dc for arm hole