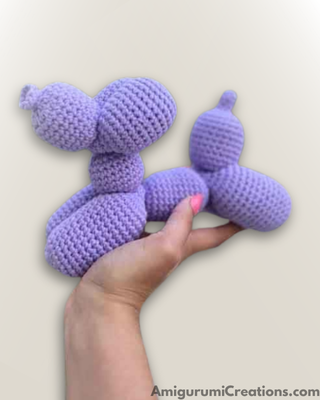
crochet balloon dog free pattern 2025

Lots of people lovecrochet balloon dog free pattern animals! But they always have an unfortunate tendency to pop or deflate over time. So why not make a more long-lasting version? This cuddly plush has a beginner-friendly pattern, and makes a perfect companion for any dog and/or balloon lover. Free teddy bear crochet pattern_ free cat crochet
Find the Perfect Crochet Pattern!
Create beautiful crochet toys with my collection of free Amigurumi patterns. From easy patterns for beginners to more advanced designs, there is something for everyone to enjoy!
Materials:
● 5mm crochet hook
● Worsted weight yarn (about 200g)
● Polyester fiberfill
● Yarn needle
(You can use whatever yarn and hook size you’d like, just be aware that it will change the size of
the finished product. I used the materials above, and my plush measures 8 ½ inches long and 8
inches tall.)
- Abbreviations:
- Sc = single crochet
- Inc = increase stitch
- Dec = decrease stitch
mini balloon dog crochet pattern free
Tail
Make a magic ring with 6 sc.
Rows 1-4: sc around (6)
This is the “uninflated” part at the tip of the tail, inc or dec number of rows to your preference.
Row 5: inc around (12)
Row 6: repeat Row 5 (24)
Pull yarn end from the magic ring tight and weave in before continuing.
Rows 7-16: sc around (24)
Row 17: dec around (12)
Stuff segment to preferred firmness.
Row 18: dec around (6)
Rows 19-22: sc around (6)
Legs
Row 23: inc around (12)
Row 24: repeat Row 23 (24)
Rows 25-38: sc around (24)
Rows 39: dec around (12
Stuff segment to preferred firmness.
Row 40: dec around (6)
Rows 41-44: sc around (6)
Repeat to make the second hind leg, ending on Row 66.
Body
Row 67: inc around (12)
Row 68: repeat Row 67 (24)
Rows 69-78: sc around (24)
Row 79: dec around (12)
Stuff segment to preferred firmness.
Row 80: dec around (6)
Rows 81-84: sc around (6)
Repeat Legs Pattern 2 more times to make the front legs.
Ending on Row 128 with a total of 6 segments so far.
mini crochet balloon dog free pattern
Neck
Row 129: inc around (12)
Row 130: repeat Row 129 (24)
Rows 131-138: sc around (24)
Row 139: dec around (12)
Stuff segment to preferred firmness.
Row 140: dec around (6)
Rows 141-144: sc around (6)
Ears
Row 145: inc around (12)
Row 146: repeat Row 145 (24)
Rows 147-156: sc around (24)
Row 157: dec around (12)
Stuff segment to preferred firmness.
Row 158: dec around (6)
Rows 159-162: sc around (6)
Repeat for the second ear, ending on Row 180.
Head
Row 181: inc around (12)
Row 182: repeat Row 181 (24)
Rows 183-190: sc around (24)
Row 191: dec around (12)
Stuff segment to preferred firmness.
Row 192: dec around (6)
Row 193: sc around (6)
Row 194: inc around (12)
Secure yarn end and cut tail long enough to weave in.
Twist to form a dog shape as one would with a balloon
(Ohana Craft Amigurumi has a good visual guide for this here:
Once twisted, you can sew the joints for extra stability if you want
Explore More of My Amigurumi Tutorials
Join me in my step by step video tutorials and learn how to crochet simple projects with confidence. Fun and easy to follow videos that will guide you through the creative process