crochet bat pattern-Easy Step-by-Step
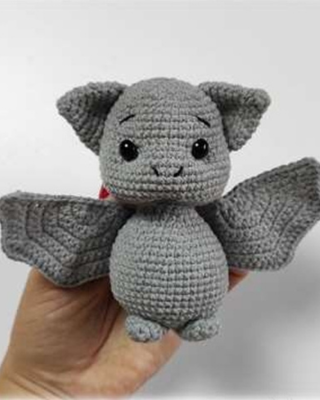
I’ve always had a soft spot for cute and spooky, so it only felt right to add a little crochet bat pattern friend to my amigurumi family. This little guy works up quickly and makes a great seasonal decoration—
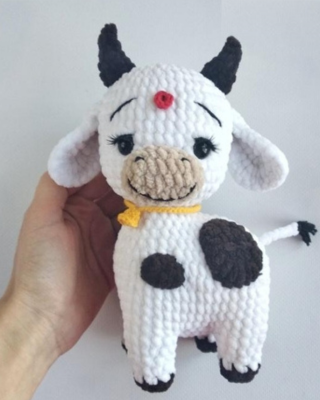
or just a year-round buddy if you’re like me and secretly love Halloween all year long. I hope you enjoy making him as much as I did!” Minnie Mouse free pattern ; Little Hamster pattern
materials and tools:
YarnArt Jeans (55% cotton, 45% polyacryl, 50 g/160 m):
- any color you desire (1 ball);
- secondary color – black and orange (for hat)
- orange and brown (for pumpkin)
- Safety eyes Ø10 mm
- Size 1.75mm crochet hook
- Toy stuffing
Abbreviations
- MR – magic ring
- SC – single crochet
- x- stitch number
- Work in a continuous spiral.
- DEC – decrease
- INC – increase
- DC – double crochet
- HDC – half double crochet (make yarn over and draw working yarn
- through next stitch, 3 loops are still on hook, draw yarn through all 3 loops on hook)
This little crochet bat pattern is quick to make, full of personality, and just spooky enough to be cute. Whether you’re decorating for Halloween or simply love bats as much as I do, I hope this pattern brings a smile to your face and a new friend to your collection.
Resources and tutorials you may find helpful in following this pattern: Crochet Abbreviations, US to UK Crochet Conversion Chart. Find links to stitches on the “Tutorial” menu: will show basic stitches used in many patterns and shows our growing collection of crochet stitch tutorials
easy crochet bat pattern -Easy Step-by-Step
HEAD – BODY
- Start 6SC in a mr (6)
- 6 INC (12)
- (1 SC, INC)х6 (18)
- 1 SC, INC, (2 SC, INC) х5, 1 SC (24)
- (3 SC, INC)х6 (30)
- 2 SC, INC, (4 SC, INC) х5, 2 SC (36)
- (5 SC, INC)х6 (42)
- – 12. 42 SC (5 rows)
- 7 SC, CH1, skip 1 stitch and continue working from next stitch:8 SC, CH1,
skip 1 stitch and continue working from next stitch: 25 SC (42) - (1 SC, INC)х12 , 18 SC (54)
- – 19. 54 SC (5 rows)
- 3 SC, DEC, (6 SC, DEC) х5, 3 SC (42)
- (5 SC, DEC)х6 (36)
Insert the eyes in the 13th round into the
holes you made. - (2 SC, DEC)х9 (27)
- (1 SC, DEC)х9 (18)
- 18 SC
- (2 SC, INC)х6 (24)
Stuff head tight forming cheeks - 24 SC
- (3 SC, INC)х6 (30)
- (4 SC, INC)х6 (36)
- 36 SC
- 5 SC, INC)х6 (42)
- 42 SC
- (6 SC, INC)х6 (48)
- – 42. 48 SC (7 rows)
- 3 SC, DEC, (6 SC, DEC)х5, 3 SC (42)
- (5 SC, DEC)х6 (36)
- 2 SC, DEC, (4 SC, DEC)х5, 2 SC (30)
- (3 SC, DEC)х6 (24)
- 1SC, DEC, (2 SC, DEC)х5, 1 SC (18)
- (1 SC, DEC)х6 (12)
- 6 DEC (6)
Pull a circle, fasten off yarn tail, and hide inside.
free crochet bat pattern pdf
EARS
Do not stuff the ears.
- Start 6SC in a mr (6)
- 6 SC
- 6 INC (12)
- 12 SC
- (1 SC, INC)х6 (18)
- 18 SC
- (2 SC, INC)х6 (24)
- 24 SC
Fasten off yarn, leaving a long tail to sew.
Ravelry free crochet bat pattern PDF
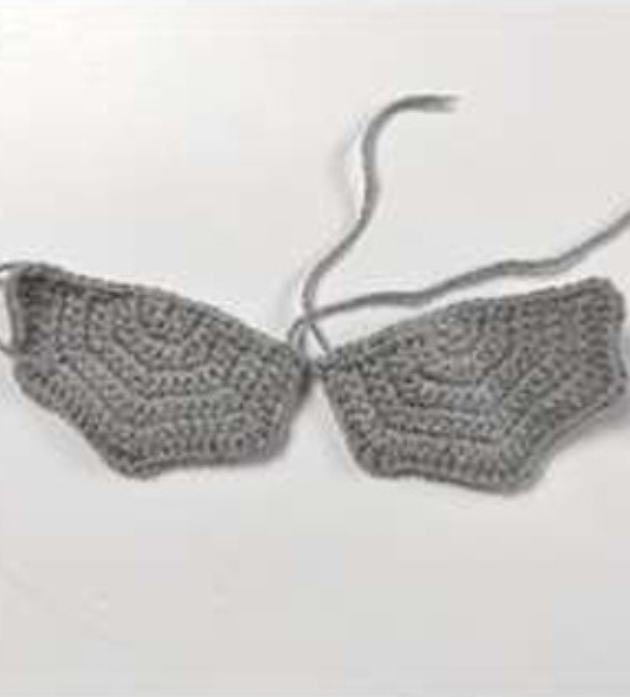
WINGS
Turn the item and make ch in the end of each row.
Left wing:
- Start 4 SC in a mr, close the ring, but DO NOT CONNECT it, CH1 (turn the
work) - 4 INC, CH1 (8)
- 1 SC, (1 SC, INC)х3, 1 SC, CH1 (11)
- (2 SC, INC)х3, 2 SC, CH1 (14)
- 2 SC, (INC, 3 SC)х3, CH1 (17)
- 3 SC, (INC, 4 SC)х2, INC, 3 SC, CH1 (20)
- 3 SC, (INC, 5 SC)х2, INC, 4 SC, CH1 (23)
- 4 SC, (INC, 6 SC)х2, INC, 4 SC, CH1 (26)
- 4 SC, (INC, 7 SC)х2, INC, 5 SC, CH1 (29)
- 5 HDC, 3 DC INC, (8 HDC, 3 DC INC)х2,
4 HDC, 3 DC INC, continue crocheting
along the upper part of the wing: 18 SC
Fasten off.
Right wing:
- Start 4 SC in a mr, close the ring, but DO
NOT CONNECT it, CH1 (turn the work) - 4 INC, CH1 (8)
- 1 SC, (INC, 1 SC)х3, 1 SC , CH1 (11)
- 2 SC, (INC, 2 SC)х3, CH1 (14)
- (3 SC, INC)х3, 2 SC , CH1 (17)
- 3 SC, (INC, 4 SC)х2, INC, 3 SC , CH1 (20)
- 4 SC, (INC, 5 SC)х2, INC, 3 SC, CH1 (23)
- 4 SC, (INC, 6 SC)х2, INC, 4 SC, CH1 (26)
- 5 SC, (INC, 7 SC)х2, INC, 4 SC, CH1 (29)
- 3 DC INC, 4 HDC, 3 DC INC, (8 HDC, 3 DC INC)х2, 4 HDC, 3 SC INC,
continue crocheting along the upper part of the wing:18 SC
Fasten off.
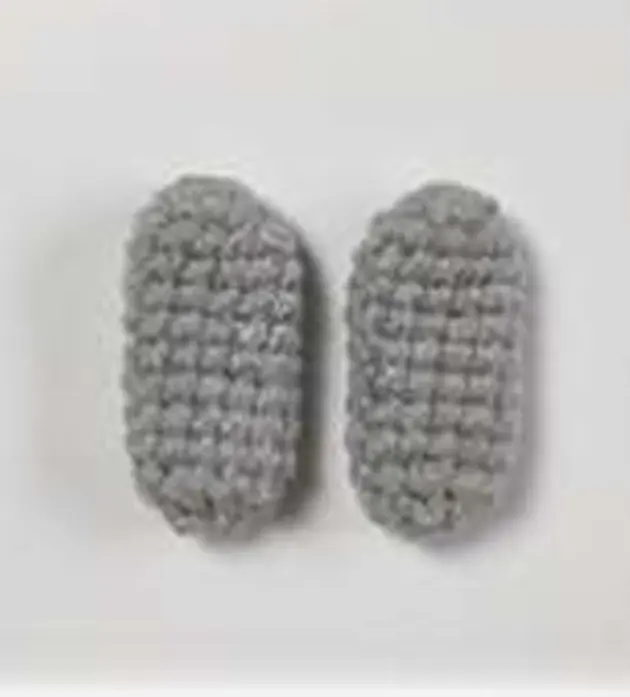
PAWS
Do not stuff the work.
- Start 6SC in a mr
- 6 INC (12)
- – 10. 12 SC (8 rows)
Close the opening, fasten off yarn, leave a long
yarn tail to sew
TAIL:
Do not stuff the work.
- Start 6SC in a mr
- – 4. 6 SC (3 rows)
Fasten off yarn, leave a long yarn tail to
sew.
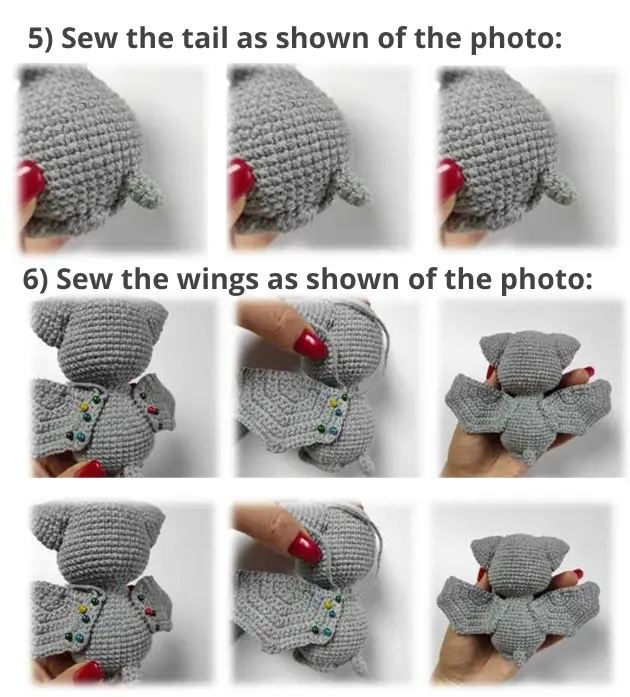
Crochet bat Pattern flat
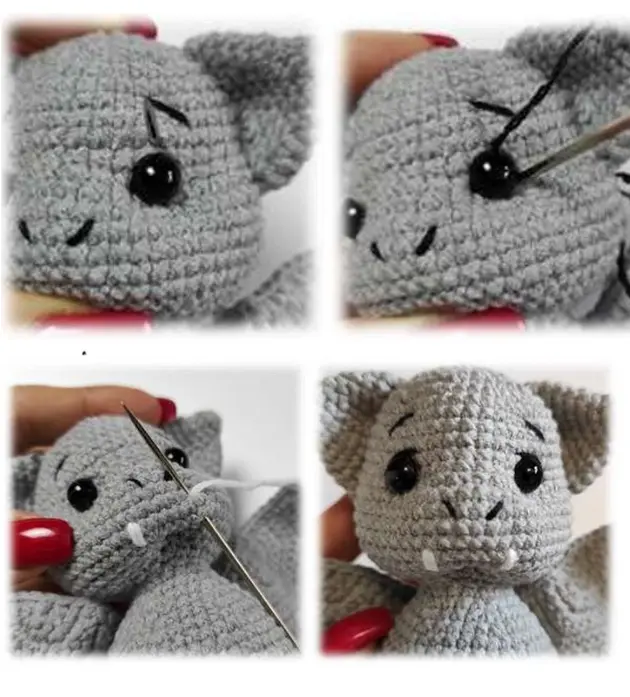
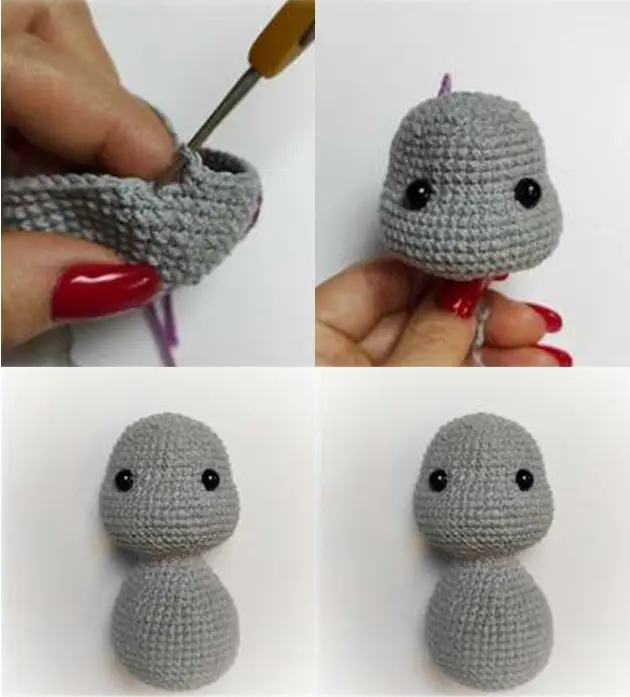
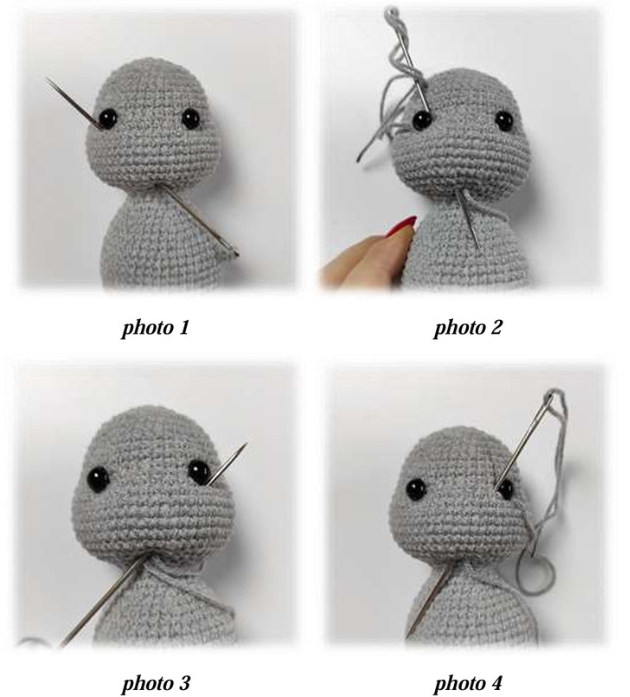
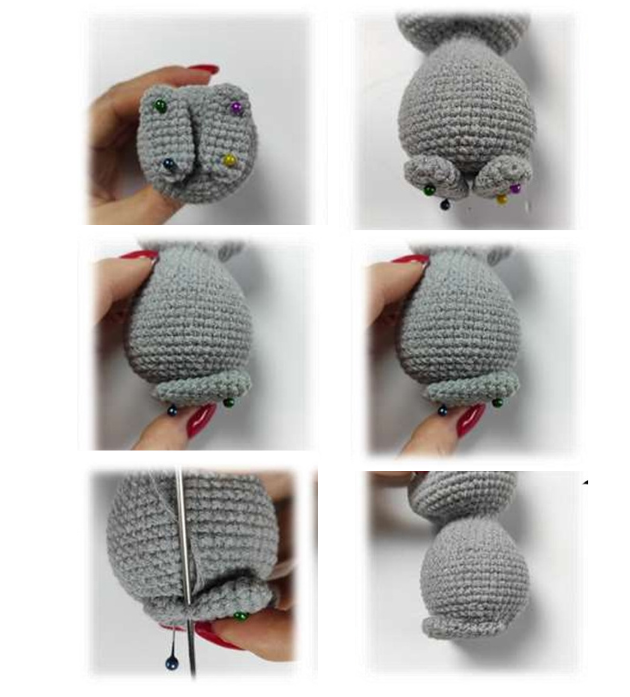
1) Head sculpting:
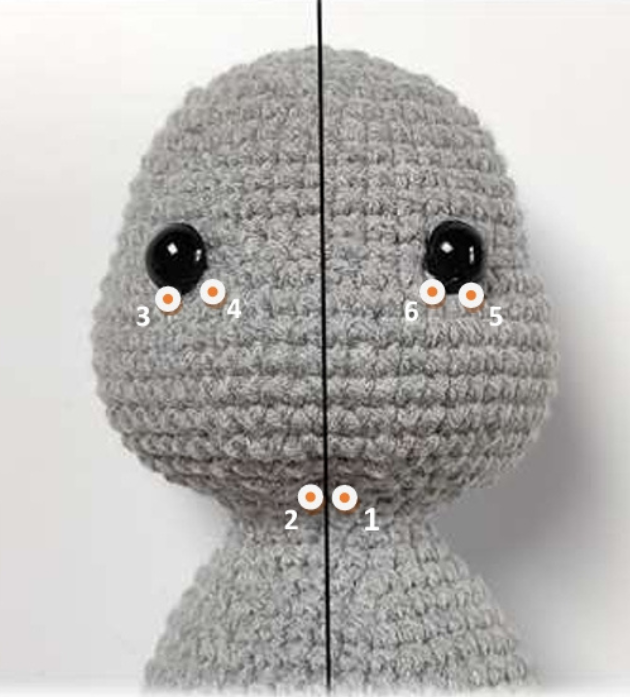
Head sculpting: Points 1,2, – between row 23 – 24 (count from the mr),
distance between them ~ 1 SC
Use strong thread. Insert needle into p.1 – pull out of p.3, leaving a long yarn
tail. (photo 1)
Insert into p.4 – pull out of p.2 (photo2 )
Insert into p.5 – pull out of p.5 (photo 3)
Insert into p.6 – pull out of p.2 (photo 4)
Tie a knot, hide remained thread tail inside.
2) Embroider the nostrils and eyebrows with black yarn
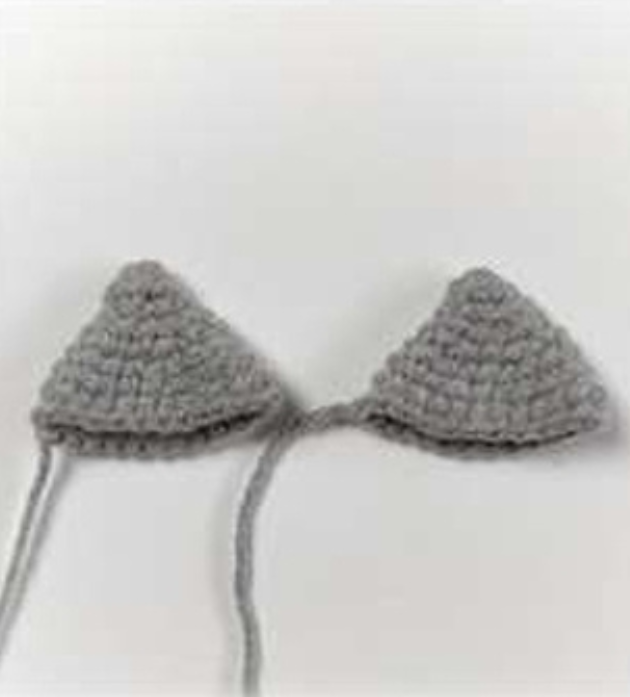
4) Sew the ears as shown of the photo:
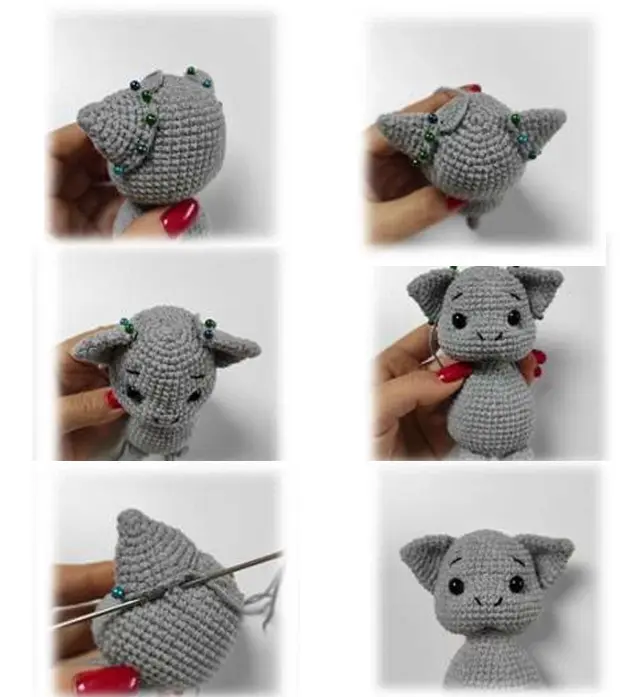
7) Embroider the eyelids with black yarn: