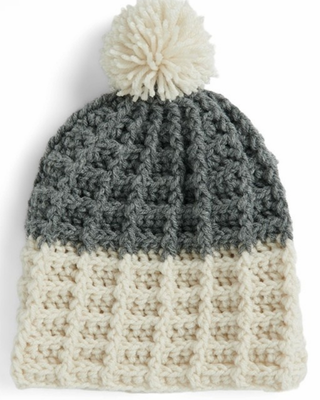
WAFFLE STITCH CROCHET HAT
Spread the loveABBREVIATIONSApprox = ApproximatelyBeg = BeginningCh = Chain(s)Dcbp = Yoh and draw up a looparound post of next stitch at backof work, inserting hook from rightto left. (Yoh and draw through2 loops on hook) twiceDcfp = Yoh and draw up a looparound post of next stitch at frontof work, inserting hook from rightto left….
ABBREVIATIONS
Approx = Approximately
Beg = Beginning
Ch = Chain(s)
Dcbp = Yoh and draw up a loop
around post of next stitch at back
of work, inserting hook from right
to left. (Yoh and draw through
2 loops on hook) twice
Dcfp = Yoh and draw up a loop
around post of next stitch at front
of work, inserting hook from right
to left. (Yoh and draw through
2 loops on hook) twice
Hdc = Half double crochet
Here are some helpful resources you may find useful while working through this amigurumi pattern:
• Crochet Abbreviations Guide
• US–UK Crochet Conversion Chart
You can also explore the “Tutorials” menu to find step-by-step guides. There you’ll discover:
• Basic crochet stitches commonly used in many amigurumi projects
• Detailed stitch tutorials to help you build your skills
- Hdc2tog = (Yoh and draw up a
- loop in next stitch) twice. Yoh and
- draw through all loops on hook
- Pat = Pattern
- PM = Place marker
- Rem =Remaining
- Rep = Repeat
- Rnd(s) = Round(s)
- Sc = Single crochet
- Sl st = Slip stitch
- Sp(s) = Space(s)
- St(s) = Stitch(es)
- Yoh = Yarn over hook
MEASUREMENTS
To fit head circumference 18 (20
22)” [45.5 (51-56) cm].
GAUGE
13 sc and 14 rows = 4″ [10 cm].
Red Heart® Super Saver™ (7 oz/198 g; 364 yds/333 m)
Sizes
S (2-4 yrs) M (6-10 yrs) L (Adult)
Contrast A Aran (0313)
Contrast B
Gray Heather (0400)
ball
ball
Size U.S. 7 (4.5 mm) crochet hook or size needed to obtain gauge.
Stitch marker. Yarn needle
NSTRUCTIONS
Notes:
- Ch 2 at beg of rnd does not
count as st. - To change color, work to last
2 loops on hook and draw new
color through last 2 loops, then
proceed in new color. - Join rnds with sl st to top of
first dcfp.
With A, ch 56 (64-72). Join in rnd,
taking care to not twist chain.
1st rnd: Ch 2. 1 hdc in each ch
around. Join with sl st to first hdc.
56 (64-72) hdc. PM for beg of rnd.
2nd rnd: Ch 2. 1 dcfp around first
hdc. *1 dcbp around each of next
3 hdc. 1 dcfp around next hdc. Rep
from * to last 3 hdc. 1 dcbp around
each of last 3 hdc. Join.
3rd rnd: Ch 2. 1 dcfp around first
dcfp. *1 hdc in each of next 3 sts.
1 dcfp around next dcfp. Rep from
- to last 3 sts. 1 hdc in each of last
3 sts. Join.
4th rnd: Ch 2. 1 dcfp around first
dcfp. *1 dcbp around each of next
3 sts. 1 dcfp around next dcfp. Rep
from * to last 3 sts. 1 dcbp around
each of last 3 sts. Join.
Rep 3rd and 4th rnds for Waffle Pat
until work from beg measures 4″
[10 cm], ending on a 4th rnd. Join
B. Break A.
With B, rep 3rd and 4th rnds for
Waffle Pat until work from beg
measures approx 5 (6-61/2)” [12.5
(15-16.5) cm], ending on a 4th rnd.
Shape top
1st rnd: Ch 2. 1 dcfp around first
dcfp. *1 hdc in next st. Hdc2tog.
1 dcfp around next dcfp. Rep
from * to last 3 sts. 1 hdc in next
st. Hdc2tog. Join. 42 (48-54) sts.
2nd rnd: Ch 2. 1 dcfp around first
dcfp. *1 dcbp around each of next
2 sts. 1 dcfp around next dcfp. Rep
from * to last 2 sts. 1 dcbp around
each of last 2 sts. Join.
3rd rnd: Ch 2. 1 dcfp around first
dcfp. *Hdc2tog. 1 dcfp around
next dcfp. Rep from * to last 2 sts.
Hdc2tog. Join. 28 (32-36) sts.
4th rnd: Ch 2. 1 dcfp around first
dcfp. *1 dcbp around next st.
1 dcfp around next dcfp. Rep from
- to last st. 1 dcbp around last st.
Join.
5th rnd: Ch 2. 1 dcfp around first
dcfp. *Skip next st. 1 dcfp around
next dcfp. Rep from * to last st.
Skip last st. Join. 14 (16-18) sts.
6th rnd: Ch 2. 1 hdc in same sp as
sl st and in each st around. Join.
7th rnd: Ch 2. (Hdc2tog) 7 (8-9)
times. Fasten off, leaving a long
end. Draw end through rem sts.
Pull tightly. Fasten securely.
Pompom: Wind A around 3 fingers
100 times. Tie tightly in the middle
and leave a long end for attaching
to Hat. Cut loops at both ends and
trim to smooth round shape. Sew
securely to top of Hat